Thursday 29 November 2012

Snow Queen - For Ceative Expressions

See, told you I was going to post something painty today!!
This little lady is my weekly DT project for Creative Expressions .... meet my Snow Queen!
For the next few weeks we are focussing on two fab stamp sets, the If the Crown Fits plate, and the Masquerade plate. Whilst not strictly speaking Christmassy stamps, I think I'll have a go and see if I can still come up with Christmas/Winter projects using them! (may be famous last words...watch this space!)
So, my first assemblage is a Snow Queen!
I started off with a papier maché cone, and smeared it with Lake , Waterfall and White Eco Green paint. Once dried, I covered the whole thing with glue, and the sprinkled with Rock Candy Dry Glitter . So sparkly!
I twisted some wire into wing shapes....
And gave her some wire arms too. The face was stamped and cut out, then adhered to the top of the cone.
The fabulous crown is from the 'If The Crown Fits' plate. I stamped it onto a painted bit of card, cut it out and added some sparkle!
The Snow Queens staff (sceptre?? who knows!) is a key from the same plate, but I've chopped a bit off so it looks like the aforementioned staff!
The wire hand simply wraps around it, and a touch of glue keeps everything secure!
So, a simple Snow Queen, whimsical and very sparkly!!
Love Trish xx


Wednesday 28 November 2012

Stackable bangles...

Have proved to be a huge hit this year... lots of gorgeous sparkle and a bit of bohemian chic thrown in for good measure! These started out as a project for Beads And Beyond magazine a couple of months ago, people loved them when the article came out, yay! I decided to make a few for general sale too, and they've simply flown out the door. Here's a pic...
Loads together on your arm make such a fab jangly sound....!
I promise to share something painty tomorrow!!!!
Trish xxxxxx

Monday 26 November 2012

Back to blogland!

I've been a bit absent recently....and no, I don't just mean I'm getting more forgetful! I've been preparing for a big selling event with my jewellery, so the messy painty stuff has had to take a bit of a back seat!
All done now, though, so bring on the paint!!!!
As I have nothing new to show you with paint or ink involved, I thought I'd share a few new jewellery pieces!
Long wrap around bracelets have proved to be very popular, I love wearing these too! Colour is just as important to me when creating jewellery as it is when getting messy!
The blue and red bracelet is fastened with a button from my very talented friend Julie over at Lush Lampwork . Someone else who shares my love of colour!
The other thing that sells very well at this time of year are big chunky charm style bracelets filled with beads....
As each bead is individually wire wrapped onto the base chain, these do take a while to make, but the end result is worth it!!!
Have a great Monday everyone!
Love Trish xxx


Saturday 24 November 2012

Colourful Christmas-For Calico Crafts

Morning!
The last of my week of Christmas Cards is now live over at the Calico Crafts Blog !
Its a bit of a combination of the first two cards, plus a bit of extra colourful painty mess! Well it wouldn't me me if didn't have that eh?!!!
Here's a little peek....
Why not pop on over and see the whole thing!!
Love Trish xxx

Thursday 22 November 2012

The Christmas Star- For Creative Expressions

Hello!
Today I'm sharing another DT project for Creative Expressions. I may have mentioned a little 3D assemblage was on the way...well, here it is!
A scene using a Christmas tree stamp from one of the featured plates this month, the Umount Let It Snow plate.
I've stamped the tree three times onto kraft card using white paint...
I left a 'trunk' shaped piece of card on the trees when I cut them out. I wrapped this card with twine, which I then coloured with more white paint.....
The trees were then glued to a piece of whitewashed driftwood. The star is made from Nestaboard Chipboard Star . Its not the smallest one in the pack, but the next up in size! Covered with white paint, then I added a coil of silver wire. This was then glued to the driftwood base as well....
Once all the glueing was done, all the gorgeous shimmer and sparkle you can see was added. I used white paint to cover the glue, then added white and silver embossing powder sprinkles, and lots of Clear Rock Candy Glitter . I also splattered some Silver ink to add even more sparkle. The tops of the trees were given some glitter too...
I created a phrase on the computer, printed it off then added it to the driftwood as a finishing touch. I hope the sparkle comes through in the pictures, this is so icy and shimmery in real life!!
See you soon!
Love Trish xxx


Wednesday 21 November 2012

Christmas Cards, part two! For Calico Crafts

Morning!
I've posted the second of my three cards for Calico Crafts over on the blog this morning. This one is a little more 'starry'!!
Why not pop on over to the Calico Crafts Blog to have a look at the whole thing!!
Have a great day,Trish xxxxx

Monday 19 November 2012

Monday Sneak Peek- For Calico Crafts

Hello!
This week over on the Calico Crafts blog I'll be sharing some Christmas cards... a variety of colour schemes and skill levels so be sure to take a look! Todays project looks a bit like this..
Why not pop over Here to take a look!
I'll have more on Wednesday and Saturday..... see you soon!
Love Trish xxx

Thursday 15 November 2012

Contemporary 'Noel'- for Creative Expressions

Hello everyone!
This week I've chosen a contemporary design and colour scheme for my DT project for Creative Expressions ! I've used the Heartfelt Ornamental Medallions stamp set by Heartfelt Creations as the main stamped images, just love the versatile nature of these stamps!
This would make a fab Christmas card for a trendy teenager, or the design can be tweaked to become a birthday card!
The background was stamped repeatedly with a large medallion/bauble from the set..
A simple black strip of card was used to showcase some chipboard letters covered with pink glitter..
The final touch was a big blousy flower embellishment....
These are very 3D and very eye catching..but very simple to make!
Here's how.....
Stamp a design repeatedly onto copy paper. It needs to be paper rather than cardstock, as thicker cardstock is more difficult to loop nicely!
Cut the paper into very thin strips..
Decide how big you want the loops to be, and trim the paper accordingly...
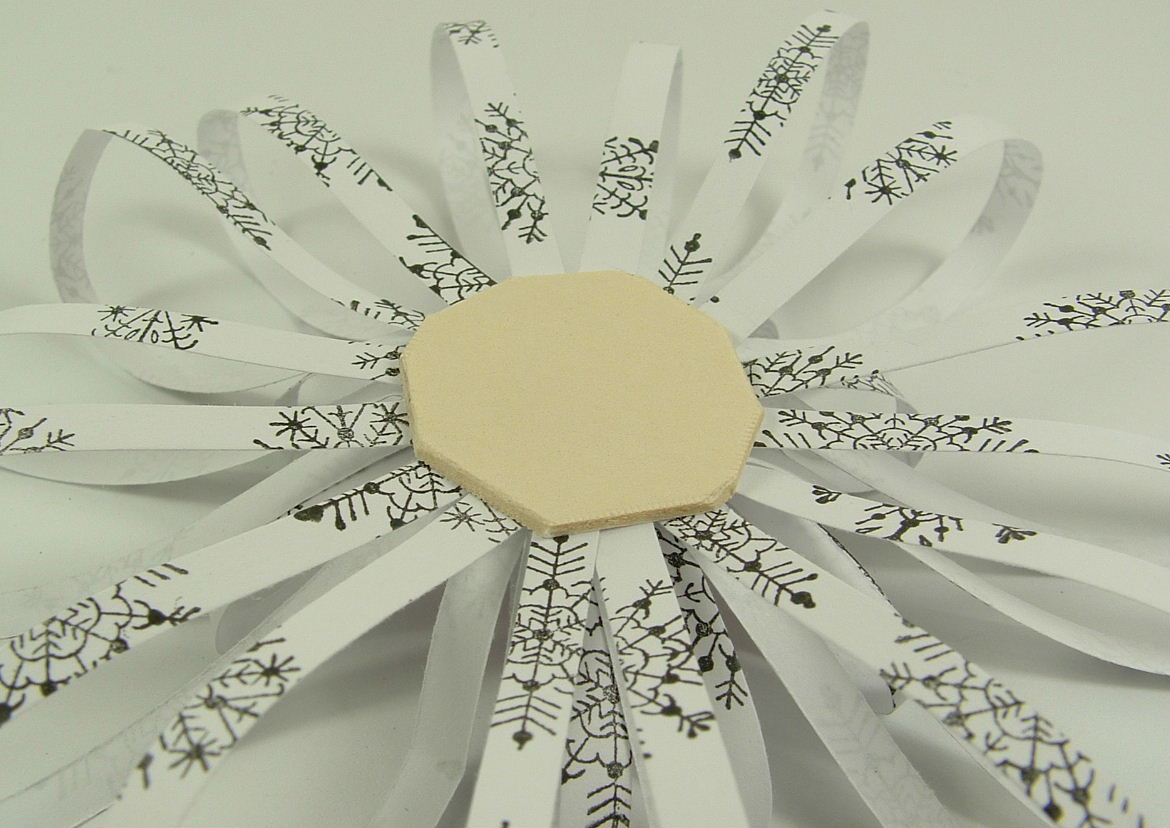
Using a chipboard base, gently loop the paper and adhere...
Keep adding loops to form the base layer of 'petals'....
Fill in the gaps until you're happy with the amount of 'petals'...
Cut some shorter pieces to form shorter loops, and adhere these to the centre of the flower...
To form the centre, I've used a large Circle Dazzler. I've coloured it with Raspberry Alcohol Ink ....
Once dry, add to the centre of the flower...
I like to use a large base to stick my loopy petals onto, but this can be seen under the loops once you're done. Easily solved..just trim it off!
Now its invisible when you turn the flower the right way!
As I said, easy-peasy to create, and a nice way of adding dimension to your work!
Hope you like this ultra modern take on a Christmas card!
I'll be back next week with a more 3D assemblage to show you!
Love Trish xxxx


Friday 9 November 2012

Je ne regrette rien...

Don't panic, haven't done anything drastic!
With the old painty mojo having done a bunk this week, I thought I would get back into the habit of entering a few challenges. This weeks challenge over at Simon Says Stamp and Show is "Inspiration Francaise".....hence the title of my blog post!
 I started off by adding some French text paper to a piece of card. then got painty all over the top! Lots of stamping and stenciling and printing...
I added some texture with coloured puff paint...
And then added in my image of a very haughty looking lady! (from 100 Proof Press)
I think the Edith Piaf lyrics seem to suit her just perfectly!!!! She definitely has a look of regretting nothing!
I had fun with this theme, why not hop on over and see what others made of it?
Love Trish xxxx


Thursday 8 November 2012

Elegant Baubles..For Creative Expressions

Morning!
My project this week for Creative Expressions is a card with a vintage Christmas colour scheme of browns, golds and reds. I've showcased the Heartfelt Creations Ornamental Medallion stamp set , a lovely stamp set that can be used as either baubles or snowflakes I would say!
For the background, I've used Brown , Red , and Gold Adirondack Paint Dabbers . I used two sizes of sequin waste to stencil through, and I have also stamped using elements from the Umount Urban Beat stamp set by Sam Poole.


I glued some text paper to some chipboard, then stamped the three large medallions onto the text. I cut them out, then adhered them to the background..
I printed (using the edge of an old store card) some gold lines above the medallion baubles to mimic the hanging thread, then used tiny red bows made from embroidery floss to finish.

This is my vintage take on this stamp set, check back next week for an up to the minute contemporary look!!!
Love Trish xx


Monday 5 November 2012

Monday DT project for Calico Crafts!

Morning all!
Its my turn again over at Calico Crafts today....and this time I have no sneaky peek for you...totally forgot, so you'll have to see the whole thing!!
I made an angel...
PLENTY of good reasons to go and check out the blog over at Calico Crafts however, I've done a step by step tutorial so you can see exactly how I made her!
Have a lovely day!
Trish xxxxx


Thursday 1 November 2012

Santa Canvas- For Creative Expressions

Morning everyone!
I have a canvas to share (a change for me then huh?!!!!) for my Creative Expressions DT project this week.
I've made an icy snowy canvas using one of this months featured stamp sets, the Let it Snow A5 Umount set. The other featured set this month is the Heartfelt Ornamental Medallion set , so watch out for some makes from me using these fab stamps in the next few weeks!
So, my canvas....
As ever, I created a painty background on the canvas, using Waterfall , Lake and White Eco Green paint, and also a little Denim Adirondack Acrylic Dabber to highlight the edges.
 (Check out my previous post Here for a step by step on how to create a similar painty background!)
I sprinkled a little white Embossing Powder onto the canvas too, so it looks like snow when melted! This effect can be seen on the snowflakes here...
I cut the flakes using a Spellbinders die, loads of gorgeous snowflake designs to choose from across the range! To add a little detail, I added a strip of music paper and a strand of twine.....
A few tiny pearls were dotted about randomly too!
The feet for the canvas were made from rolled up paper....nothing complicated! Once they are painted up the match the project, they look cool!
The snowman and a sentiment from the Let It Snow plate were stamped onto white card, cut out and added to finish...
I'll have another creation featuring these Christmassy stamps next Thursday, why not check back and see!
Love Trish xxxx