Wednesday 27 February 2013

I brought you a heart...

Hello!
My turn today over at A Sprinkle Of Imagination, and I'm sharing loads of step by step pics to show you how I created this....
Please pop on over to the ASOI blog and have a look (and let me know what you think of my new toy!!!!)
Trish xxxx

Monday 25 February 2013

Adore- an embellished frame

Hello!
My DT piece for Calico Crafts this week is now live on the blog! Another red/brown/ gold combo, this project is an embellished frame.... or, a teeny frame on a large background!
Please pop on over to the CC blog to have a closer look, and I'll share how I made it!
Love Trish xx

Friday 22 February 2013

Circus Circus!

Hello!
I'm sharing a chunky wooden ATC creation over at A Sprinkle Of Imagination today...very colourful, it put me in mind of a circus clown outfit!
Please pop on over to the ASOI blog to have a closer look, lots more pics and an explanation of how I made it!
love Trish xxx

Thursday 21 February 2013

In the middle of our street...

Hello!
Half term here, and things are just a tad manic....... I still, just about (!), managed to get my Creative Expressions DT project made for today, so here it is...the fabulous Art Houses by Sam Poole featuring again!
All the colour in this piece was created by spraying Cosmic Shimmer mists, both in the background..
and on the houses themselves!
I used Golden Fish (the orange colour), Golden Mint (green), Bilberry Crush (purple), Teal Wash (turquoise) with splats of Midnight Blue.
The base is a simple piece of cardboard, with some extra corrugated card added along the bottom. I painted the whole thing white before I started spraying. This means the colours stay nice and bright rather than fading into the brown cardboard colour!
I sprayed another piece of cardstock, and stamped the houses over the colour using Archival ink. Stamped again onto plain white, then the windows and doors cut out and added to the colourful ones!
Once the houses were stuck down, I added a little few printed circles, and highlighted them with white pen...
Of course, the house 'In the Middle of Our Street' got an extra big circle to emphasise it!
I love spraying, so quick, and the colour combos created are so much fun!!
Trish xx


Saturday 16 February 2013

Fly!

Hello!
My turn again today over on A Sprinkle Of Imagination! I may have achieved some kind of record, two DT  projects in a row with no paint on!!! Here is 'fly'...
Please pop on over to the ASOI blog, where I'll be showing lots of closeup pics, and letting you in on what I used, and how I used it!!
Have a great weekend!
Love Trish xxx

Friday 15 February 2013

Hi!

I actually had time to have a 'just for me' play session yesterday.... a cancelled workshop meant my usual kitting up and prep time was totally free!!! So, I thought I would have a look around the challenges and see if there were any I could play along with! As usual Simon Says Stamp And Show have a fabulous theme this week..... "Something Messy". Um, that covers every single thing I do (even if it was SUPPOSED to be a clean and simple make!) so I just played...and this is the result!
The base is a square of greyboard (it was the back of a reinforced envelope!). The messy part started right from the start as i smeared on lots of white paint, thickly in places and especially the edges. once heated with a heat tool, the thick paint bubbles up and great texture happens! I then used some texture paste through a new stencil...LOVE this, its a splat design that seems random but if you look closely there are tiny hearts!
Once the paste was dry, I smeared green and blue paint gently over the whole thing. The texture means lots of white areas as I hadn't used too much paint. A little background stamping in places...
Some black paint splats...
I also used a little red paint to make things 'pop', as you can see on the textured heart in the pic above!
I also used Treasure Gold wax in places to highlight and give a subtle golden sheen. Possibly a bit too subtle to see in the pics!!!
The little guy is a Cats Life Press image, waving at everyone as I haven't been around the challenge scene for ages!!!
So, that's my messy project! I had fun, and have made a mental note to play more and more importantly, join in more!!!
love Trish xxx


Thursday 14 February 2013

Spool Street!

Hello!
The Creative Expressions Design Team have been lucky enough to get some brand new stamps to play with this month, and boy are they fab! I have made my first project using the Art Houses Plate designed by Sam Poole, love it! Here is 'Spool Street'....
These stamps are so easy to use to get a very creative look.....all I've done is stamp them onto white card, then paper pieced the details! I coloured scrap card with Watermelon, Citrus and Pool paint (from the Adirondack Paint Dabber range), then stamped each house again onto the painted card, cut out the detail and mounted it onto the relevant black and white house!
As I've used paint as a base to stamp onto, colour matching up the spools to the image details is an absolute doddle! Acrylic paint will cover anything, the two larger spools are plastic, the smaller one wood. What you DO need to remember is that you mustn't try and speed up the drying process of paint on plastic with a heat tool........... yep, the plastic will melt! So patience is required, but I reckon the spools dried enough for a second coat within an hour or so, so not too bad!
I stamped the Newsprint background stamp onto white copy paper, then cut it into strips and wrapped around the spools. I used paper rather than card because of course paper is more flexible, something to consider when you want to wrap the image around something!
The houses were then mounted onto the spools. The 'pool' coloured house has a heart that sits just slightly lower than the base of the house, and it was pure luck that the spool I used had a nice large central hole where the extra 'bit' could sit! They were all held in place with a bead.... glue the bead to the spool, then glue the house to the bead! Like this....
I hope you like my bright and cheerful little street of art houses, I suspect the rest of the design team will be coming up with some stunning projects based on these stamps, so be sure to check them out!
Trish xxxxx


Wednesday 13 February 2013

A Box Full of Love

Hello!
My turn again on the Calico Crafts Blog! A last 'hearty' project before Valentines Day tomorrow...I've made a Box Full of Hearts..
please pop on over to the Calico blog, there are loads more pics and instructions on how I created it!
Have a great day!
Trish xxxxx

Monday 11 February 2013

Craft Stamper Blog Hop Spot Prize - THE WINNER IS.....

Hello!
THANK YOU so much for all the lovely comments that were left on my Blog Hop post, they were all much appreciated!!
Now....as promised I have to choose a winner for all this little lot...
Well, I say *I* have to choose, I should say that Mr Random number thing has to choose!
So without further ado....
And that means the winner is....... KAREN 

                                                                
with the comment:
"Awe Trish!!!! I love that you found your puff paints again! I would never have thought to use it for my journalling. Off to search mine out now, thank you x"
http://karenscarryons.blogspot.co.uk/
So please can you get in touch Karen, and let me know your address!
Thank you all again for your comments...and Karen, we'll be wanting to see what you create!!!
Love Trish xxxxxx


Cherish - A Wooden Heart plaque

Hello!
I have my latest project for Calico Crafts over on their blog this morning, a wooden heart plaque.....
Please pop on over to the Calico Crafts Blog to see some more pics, and the details of how I made it!
Love Trish xxxxx

Sunday 10 February 2013

Dotty Canvas!

Hello!
My turn over at A Sprinkle Of Imagination today, and (you may need to sit down...) no paint in sight!! I got the inks out to create this...
Please pop on over the ASOI blog to see more closeup pics, and to find out how I made it!
Have a great day,
Love Trish xxx

Friday 8 February 2013

Craft Stamper Blog Challenge!

Hello!
Today sees the launch of a brand new blog challenge, the Craft Stamper Take it, Make it challenge!
Be sure to head on over to the Craft Stamper blog to have a good look, the winning entry will get published in the magazine itself.... not something any other challenges can offer as a prize!
Some of the Design Team have shared some examples of the technique being showcased by the first challenge, the Faux Airbrush technique. Here is my take on the theme....
I've used a circular stencil on a square of card, and created my faux airbrush effect using Squeezed Lemonade, Ripe Persimmon and Festive Berries Distress ink. Once the inked background was done, I left the stencil in place, and stamped letters, circles, dots and a grid pattern onto the left hand side....
Before I removed the stencil I flicked some black paint splats onto the circle too!
I have kept my additional detail to a minimum to keep the focus on the background..... a single stamped image (Stampotique)
and a chitchat sticker......
I have to say, I now have an even greater respect for those of you that can create the clean and simple look in your art...this is attempt number three and there is still a smudge on the white background!!!! I think I need to stick with the messy!
So, hop on over to the Craft Stamper Blog to see all the details, and then get creating! We can't wait to see your art!
love Trish xx


Thursday 7 February 2013

Love is in the air!

Morning all!
It's Thursday, so it's time for my next DT project for Creative Expressions!
I've made a dimensional canvas board to share today....
The background was created by smearing Lime, Waterfall and Orange Eco Green Paints over the canvas board. I then used a brayer very lightly with some Black paint just to tone down the bright colours and grunge it up a little! Background stamping in places....
This was done with my 'must have on hand at all times' stamps... Bubbles, Alphabet and Chicken Wire, with a little grid from the Urban Beats plate thrown in there too! As you can see, I also added big black paint splats to the background as well.
The heart (from the Hearts Entwined plate) was stamped in black onto scraps of painted card, and cut out. I added wings because the hearts just seemed to need some!
All three hearts were mounted onto wire wrapped bamboo skewers..
I toned down the shine of the coiled wire slightly by using a dab of black paint here and there. The words are just simply computer generated, then stuck on!
Have a fabulous day everyone!
Love Trish xxx


Friday 1 February 2013

Craft Stamper Blog Hop!

Hello!
Welcome to my little part of the Craft Stamper Blog Hop! If you have landed here from Kims blog , then you're right on track! If not, not to worry...click on the blog hop logo at the top of the post, which will take you to the full list of participants. (Not that you HAVE to do things in order.....of course!)

So, if you're new here, my name is Trish Latimer and I've been on the CS design team for aproximately a hundred years..... :) My passion is paint, although I do possess every ink pad and spray known to man and a good few thousand stamps too! If its a messy technique, I'm your woman to try it!
Today I want to share a painty messy project with you. Grab a cuppa and a comfy chair as I've plenty of pictures to show exactly how I made it, and if you make it to the end of the post I have details on how to win a fantastic prize!
So, without further ado...
The theme for this Blog Hop is 'Looking Back'. This past year I've rediscovered some long forgotten bits and bobs from my stash, and now they've become must have items that I use all the time! Take puff paint for instance. I remember years ago getting very excited watching the paint puff up and go all lumpy when you heated it. Then the excitement wore off, and you were left thinking, "um, how many sheep, clouds or Santa suits am I really going to be using this for?" Back then I wasn't into messy textured art, so that was about the extent of its uses! NOW though, oh my goodness! The possibilities are endless......
Before we get to the puff paint part of my project though, we need to get the background done!
Firstly, add some interest to a square bit of chipboard or thick card. I've used some text tissue, a die cut strip and some corrugated card.
Next, cover it all with a wash of white paint or gesso to give some uniformity in colour and surface, ready to apply colour. Not too much, you still want to see glimpses of text through the paint.
The base colour is next. I've used a Pool Adirondack paint dabber (although not the dabber part, the paint goes straight onto a palette and I use my fingers to smear it on!)
 I added some pale lime ('Lemonade' Americana Acrylic by Deco Art), and some orange ('Smoked Paprika' Fresco Finish by PaperArtsy) highlights here and there..
I also gently brayered some white paint over the base too. Next, its stamping time! For this kind of background stamping I use unmounted stamps without an acrylic block. This way I get just a hint or piece of the design on my project. I use VersaMagic black ink for all my black stamping. Just find it works best for me!
The stamps I've used are a grid background by The Artistic Stamper, tiny Polka Dots by Technique Tuesday, and bubbles and an alphabet by Sam Poole for Creative Expressions.
Printing next! I've used bottle tops and the edge of an old store card to create lines and circles. I've used orange and my 'pop' colour, bright pink (Pebeo Studio 'Primary Magenta')...
I've also added a few tiny white dots here and there for some detail...
Now we're ready for the puff paint!! Yay! I use white puff paint, as then I can tint it to the shade I'm after. Squeeze some into a pot...
Add a small amount of paint to colour (I've used DoCrafts Lush Pink)
And mix well. This isn't like colour mixing though, the white of the puff paint only affects the colour of the paint you are adding very very slightly. You might imagine such a small amount of pink paint and all that white would result in a very pale shade. nope..............
Once its mixed up, you can apply to your substrate. My favourite method of doing this is scraping it through a stencil using a palette knife....
Carefully (you don't want to smear the pattern) remove the stencil...
And then the magic part... heat the paint with a heat tool!
Can you see the texture starting to develop?! Once done, you can gently highlight the lumps and bumps with more paint...
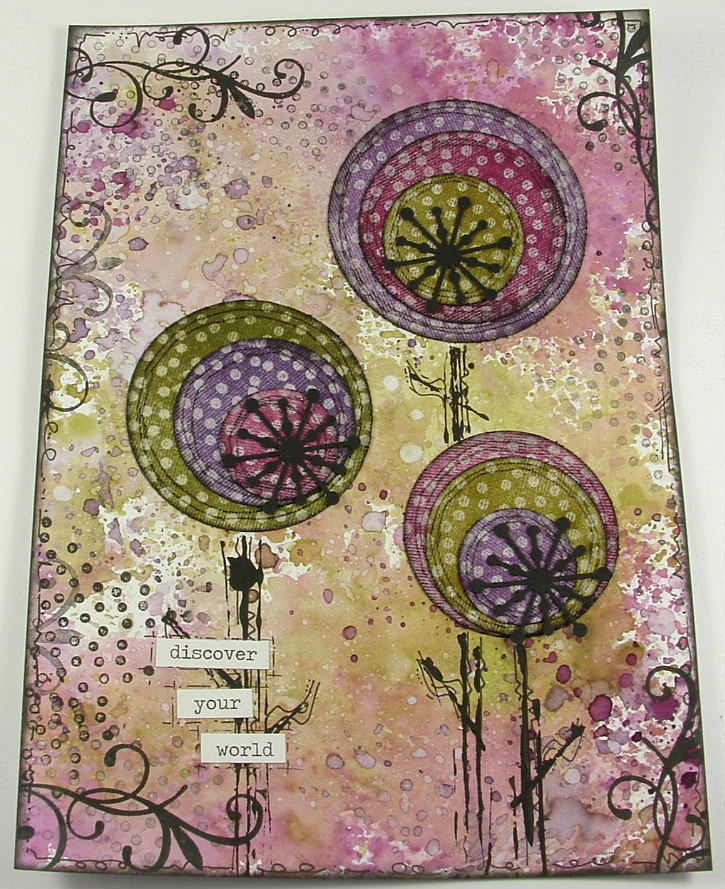
To finish off my piece I added black paint splats by flicking a paintbrush full of watered down paint at the background. I also added my stamped figure (Zettiology) to the corrugated card...
The final touch is the word 'smile'..created from AlphaPart letters..
And there you have it...all finished!
Phew! Hope you've all made it this far!
Now, on to the fun part....Free stuff!! I have a whole bundle of prizes for you to win, take a little look here..
There is... some puff paint, a stencil, some paint and some palette knives so you can have a go at exactly the technique I've shown you above! My project was done on a bit of chipboard, but that's a bit rubbish to offer as a prize so I've included two box canvases instead, a 4" x 5" and a square 5" x 5". Annnnnnnnd, there is also a copy of my 'Create With Paint' DVD too!
To win couldn't be easier, all you need to do is to leave a comment here, on THIS POST, by midnight on Friday February 8th 2013. I will draw a winner at random on the morning of Monday February 11th 2013. I'll be announcing the winner here on my blog that afternoon, so make sure to check back to see if you are the lucky one! Overseas players are welcome, posting outside the UK not a problem.
There will be prizes all over the place during the Blog Hop, so make sure you check out the main Craft Stamper blog and the  Craft Stamper Blog Event Facebook Page too!
To win the main, very very large and fabulous prize (really...go check out the list of what you could win on the main blog site..its massive!!), Blog Hoppers have been asked to collect a letter from each of us participating in the hop. Once you have all the letters, they will form a phrase. Email the phrase to Craft Stamper magazine to be in with a chance of winning! (Full details on the main Craft Stamper Blog) The Letter that you need to collect from me is....... F !
I hope you're having fun on the hop! The next stop on your way is.....
Have fun, and see you soon!
Trish 
xxxxxxx