Friday 30 December 2011

Late presents....

Finished the last lot of Christmas presents (yes i know its all over, but eldest child wasn't seeing her friends until a New Years Eve party...so I had plenty of time to get them done!) All handstamped, apart from the resin skull!!!
The group of three bracelets apparently represent Harry, Hermione and Ron...no, I have no idea..... I just make what i'm told to!
Been getting very inky today too, but i can't show you that yet.....so this will have to do!


Trish xx

woooooooo!

My tag was chosen as one of the winners on the Crafty Individuals Blog!
Wooooo!
Thank you Jo !!!
I love all things Crafty Individuals, so as part of my determination to keep up with my blog I'm sure there will be a lot more CI images appearing here regularly!
Trish xx

Thursday 29 December 2011

Exciting News!!!

I'm thrilled to be able to share that from January, I will be part of the Calico Crafts Design Team!
I can't wait to get stuck in and play with all the fabulous products!!!!!

Love Trish xx

Friday 16 December 2011

Rock Salt!

I've been digging out my bag of this to sprinkle on the doorstep as it has a nasty habit of becoming a real icy hazard ! Reminded me of a rock salt project that didn't make the final cut....this hanging was part of my series in Craft Stamper Magazine on using salt in background techniques. The long stemmed hearts have been treated to the salt soaking method (dump a load of rock salt crystals on a very wet surface, add inks and then brush off the crystals once totally dry). Coloured rock salt also added to the bottom as an embellishment!
Really enjoyed this, although I did get into a right pickle with the hot glue gun when adding the layers! You know one of those gluey projects when it just seems to go everywhere? This was one of those days!
Right, need to get a squillion pressies wrapped before the little people finish school!
Trish xx

Wednesday 14 December 2011

Her Brain....

one of my favourite stamps ever...this quote from River City Rubber Works. Their quote stamps are just fab..see here for some more examples!
Anyway, used it today on a canvas, it kind of sums up the whole Christmas feeling without being a Christmas project!
The large hatted lady is a Zettiology image.
Hope you like her!
Trish xx

Monday 12 December 2011

Configurations Box- Grannys' Sewing Room

In the hope of being more organised, I'm making sure I have next years workshops at least thought about, if not planned totally. As the Christmas Configurations box proved a real hit, I've another planned. This one is scheduled for February, and is called "Grannys' Sewing Room' . Yup, you guessed it, a sewing themed box. Not exactly original, but after having a long think, and discarding many themes that are simply too 'niche' (forgive the dreadful pun when talking about shadow boxes!), sewing it is! My sample is all made and on display at the shop if anyone is close enough to pop in and have a closer look. For those that can't get there, here are the pics.....

This is the pink version, but students can opt to do a 'shabby blue floral' box on the day if they wish. The Box itself is covered with vintage sewing patterns, then coloured with a wash of cream then pink paint. I found the most cost effective (working to a workshop budget is tricky!) way of achieving the shabby florals for the back panels in the boxes was to use tissues. Regular tissues you would blow your nose on! Cath Kidston makes tissues (and napkins) that can be pulled apart and then attached to cardstock to give the most delicious floral backgrounds. One single tissue did all nine of the back panels in my box. Bargain!
Details.....
 
The Dress form is a Sizzix die cut, again covered with patterns and painted. Lace, thread and a button to decorate.
Rolled up felt for a tiny pincushion, and tiny vials from a favourite shop SkyBluePink filled with beads.
All the stamps are from Katy Foxs fabulous stamp sheet here .

The top of the box is decorated with mini spools. These are best found in model or miniature shops. The real vintage ones cost a packet, not a plan when you need to buy in bulk for a workshop! I also customised a lot of clear buttons by simply adhering text paper and then cutting round them. Great way of making something that little bit different!
So......(ha ha geddit?!) As ever, these things book up fast, so if you're interested have a look at the details here . Maybe I'll see you there!
 Trish xx


Saturday 10 December 2011

Beads And Beyond Magazine- January Issue!

Another fabulous issue is out !!
My project this month is called "Teenage Dream" , a quirky twist on kiddie friendship bracelets. These are definitely all grown up! I created a pair of handstamped aluminium bracelets, each with a single phrase that when put together form a song lyric. Of course the words used could be anything that has significance to you and your friend, as long as the phrase makes sense when split into two!
These earrings are the 'extra' to the bracelets, same lyrics split up, but this time stamped onto copper squares and turned into earrings with the addition of some handmade spiral findings!
I think they maybe I should have given them a polish before taking the pic! oops!
Its great fun thinking up lyrics or phrases that can be split in two! To see the latest Beads And Beyond Magazine, click HERE

Trish xx

Thursday 8 December 2011

Fairy Sister!

This is the little sister of the fairy who lives in the love potion box.........nope, not lost the plot totally! I enjoyed creating the fairy box that is in this months Craft Stamper magazine  so much, I made another one! This one has been created inside a hinged wooden box, and my fairy is the tiny version of the stamp, hence little sister!
I gessoed and painted the box with blue and purple paints, then added accents in turquoise. As the inside of the box was tricky to get at, I stamped the flourish and dots that decorate it onto tissue before using ModPodge to glue it into place.
Bit of an odd photo, the large rectangle with the purple flourish on it is the open door of the box! Looks too big for some reason!
Closeup of the fairy.....
I'm liking these boxes!!
Trish x

Tuesday 6 December 2011

Craft Stamper- January edition is here!

And fabulous it is too!
Click HERE to go and see this latest issue!
My article this month is the Masterclass. I've used slide mailers for the projects, and I can honestly say that this was one of the best things I've done, in terms of having fun! Normally I have a very firm idea of what I'm going to create, and how it will look. This time, things seemed to evolve and change as I was playing, so the finished items look sooooo different to the initial 'in my head' plan. I'm going to try and be more 'free' in the way things go art wise, I think, as I really like the finished pieces!
Two little peeks to show you, firstly of the inside of the fairy box, so you can read all the words!


Secondly, a tiny bit of the shrine!


To see the whole article, including a 4 slide mailer turned into a book!, pick up a copy of the magazine. Available now from all good craft shops!!!! There is some fantabulous art in this issue, you don't want to miss it!
Trish xx

Saturday 3 December 2011

Last one of the year....

Workshop that is!
We were playing with Stampbord this morning, inking and embossing. A new surface to most of my students, so it was nice that I could show them just how fabulously well it takes ink and stamping. We made a Christmas decoration (well I suppose I had to do something seasonal!) and this card.....
Embossed acetate as well.....first time ever I've had someone manage to totally melt heatproof acetate, so that was er, interesting!
Now a nice six week break to recharge the teaching batteries and get properly organised for next year!
Trish x

Friday 2 December 2011

All Wrapped Up!

Is the theme for the new December Challenge over at Crafty Individuals . I decided to make a gift tag...allbeit a large one!
I created a painty background using pale blue, purple and white paint. I stamped the Flourish in white paint along one side. The Tree and the Postmark were stamped onto tissue, then applied to the background using ModPodge. I added a load of eyelash fibres to give some texture!
Really enjoyed making this!
Trish x

Brrrr its cold!

Sitting here with a jumper on, unheard of!!!
Very apt though, the last ATC theme of the year (and sadly of the group) is Baby its Cold Outside. Too flipping right!
Here are the four ATCs I've made, with a close up of my favourite!

Ecoline drawing inks, lots of splatters then overstamped with white paint.

Just need to finish up the class prep for my last workshop of the year (will post a pic once the glue dries!), then onto inky painty playtime for me with no agenda! yay!
Trish x

Friday 25 November 2011

playing with paper..

Not that exciting really, I play with paper rather a lot! BUT....this time I've been turning the paper into beads. Really really like the way they turned out, and I'm thinking the discs and rolls will end up stuck on a canvas sometime soon! Not just jewellery components, these have a fab look and will add some cool detail to larger art pieces. This is what I made.......

Sunday 20 November 2011

UTEE Workshop!

More prep for next years classes!
We will be creating a fab UTEE canvas on 28th January at Windmill Craft Centre .
My very favourite thing, a canvas. Something that's difficult to do in a workshop setting, only two hours doesn't give much time for things to dry! So its fingers crossed that the stamped tissue technique will be something I don't live to regret attempting! We'll also be getting out the Melting Pot to create embellishments for the canvas. So two things to stress over!
Here is the sample....


The drippy, runny embellishment is another of my new favourite things, a happy accident that gets re-used over and over!
Trish x

Friday 18 November 2011

New jewellery workshop sample!

Now that the first few workshops for next year have been firmed up (have a look HERE to see all the workshop dates so far), I'm beginning to make up the class samples.
The first jewellery class will be on January 28th, and we'll be wireworking again.
 I'll be showing the students how to create a wire frame, then we will be wrapping crystals and beads onto the frame to create a fabulous pendant. Here's the sample:


The second pic shows the beaded wire wrapping in more detail!
This one is nice and chunky, and will be finished to whatever length the creator fancies! We'll be using aubergine suede thong for this. As ever, places are limited, so contact WINDMILL CRAFT CENTRE if you fancy having a go!
Trish x

Tuesday 15 November 2011

Last jewellery workshop of the year....

Was last Saturday, over at Windmill Craft Centre . After the mental exertions of the last three wirework classes, I decided to teach a nice, calm, relaxing stringing class for a change! We made fabulous bracelets, using buttons for the clasps. Everyone chose a unique lampworked button as their first clasp. Each was different, so everyone ended up with stunning jewellery all to their own colour scheme. The buttons were created by the most wonderful Julie Fountain of Lush Lampwork Julie makes some of the most gorgeous beads you ever saw, and her buttons are just as lovely! Here is my class sample:  
We then made a long bracelet designed to be wrapped around the wrist a few times. My favourite kind of bracelet! Again, everyone chose their own colour scheme and their own button. This time, the buttons were a choice of vintage shanked buttons I'd picked up on Ebay. My class sample:
A great time was had by all!
Now looking forward to my 2012 classes, I'll be posting a peek of the next class soon!
Trish x

Monday 31 October 2011

Just like buses.....

You wait for ages then two come along in quick succession!!
It would appear I'm the cover project on the new December issue of Craft Stamper Magazine!
I may need a lie down in a dark room at this rate.......... :)
Here is a quick peek of the cover...


Thats my tag!! Silver gilding flakes.... a very yummy technique! Have a look HERE to see all the Craft Stamper Magazine info!!!

Half term is now over, so more time to get inky and painty.Yay!
Trish xx

Saturday 22 October 2011

Christmas Configurations..

Back in September, I taught a class on making a Christmas themed configurations box. Said box has now arrived home after being on display in the shop, so I have a chance to take the pics I should have taken before he went on display! Apparently there is interest in doing another one after Christmas, so its thinking cap on to decide the next theme!
 The whole thing...
A few close ups..
The above shows a deep UTEE filled bottlecap, and a chipboard star coloured and crackle-glazed.
This pic shows a tiny vial filled with large flaked glitter 'snow', and a wooden dangling snowflake.
Behind the die cut, gilded 'joy' you can see some bells peeking through the fun flock snow. There is also a wreath handmade from raffia wrapped round a stickles bottle! Tied with wire and painted up a bit, I thought it looked quite effective.
I also made a double rosette as you can see, and also a tree. This was created from folded paper not card, as I found the paper gave the sharpest creases but was still sturdy enough to stand.
The poor cherubs face detail seems to have been filled in with stickles, but it was there at the start, honest! I made the cherubs from white air dry clay, pushed into a mould.

As you can see, the whole thing was splattered with white paint 'snow' and all the boxes filled with either glitter or fun flock. All in all, the workshop took four hours, and I was very pleased at the amount of work we managed to complete in that time! A lot of configuration boxes you see have been filled with found items, which is all well and good, but I wanted to actually create the things that went inside.
Lots of messy fun was had by all, bring on the next one!!!

Trish xx

Tuesday 18 October 2011

Introducing 'Jim'.....!!

Last Friday I took a class with the most fabulous Lynne Perrella . A most wonderful time was had by all, and it was great to be able to watch one of my favourite artists in action. Lots of ideas and inspiration !!!
I must admit though, I did start to flag after a few hours, clearly I have no creative stamina! Those hardy souls who were there for the whole three day extravaganza have my admiration........
My finished triptych didn't look much like everyone elses.... I had to decide whether to go for the full on busy stencil look, or do my own thing somewhat. Whilst the others all looked fab, I'm a lover of a little empty space on a piece, so decided to create more in my own comfort zone. I would imagine that is not really the idea of going to a class, but I love my finished piece!
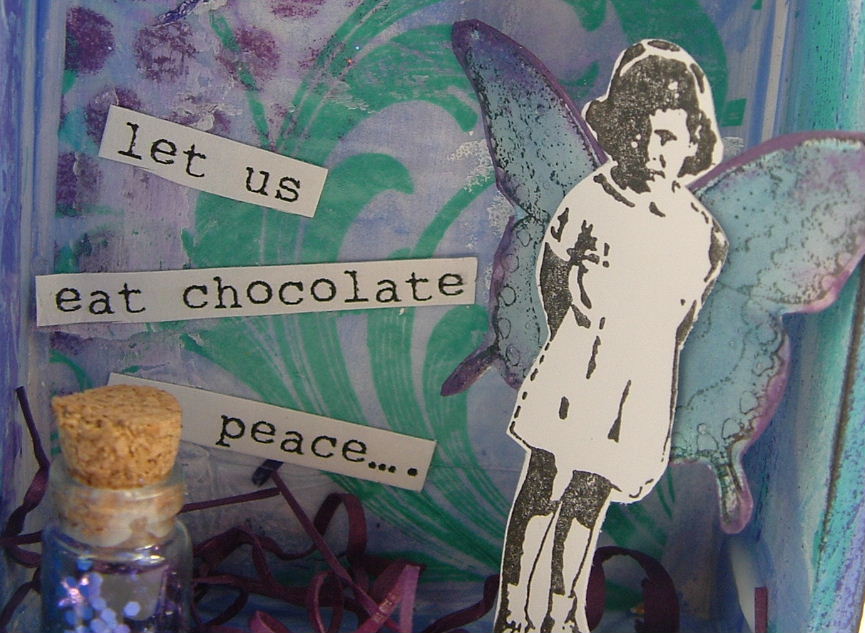
Now.....why Jim? Well, once the face and stencilled flowers had been added to my central panel, all I could see when I looked at it was Jim Morrison! I think it was reminding me of a Doors album cover or something. Once finished, it doesn't look quite as Jim-like, but the name kind of stuck.
Here it is in all its glory.....
Some detailed bits.....the dragonfly is made from 4 layers, three tissue and one clear packaging. Sewn together with twine and accent beads added.
I also made a layered flower by painting and stamping pre-made blank flower embellishments. I then put a  stamped bird on the top.....
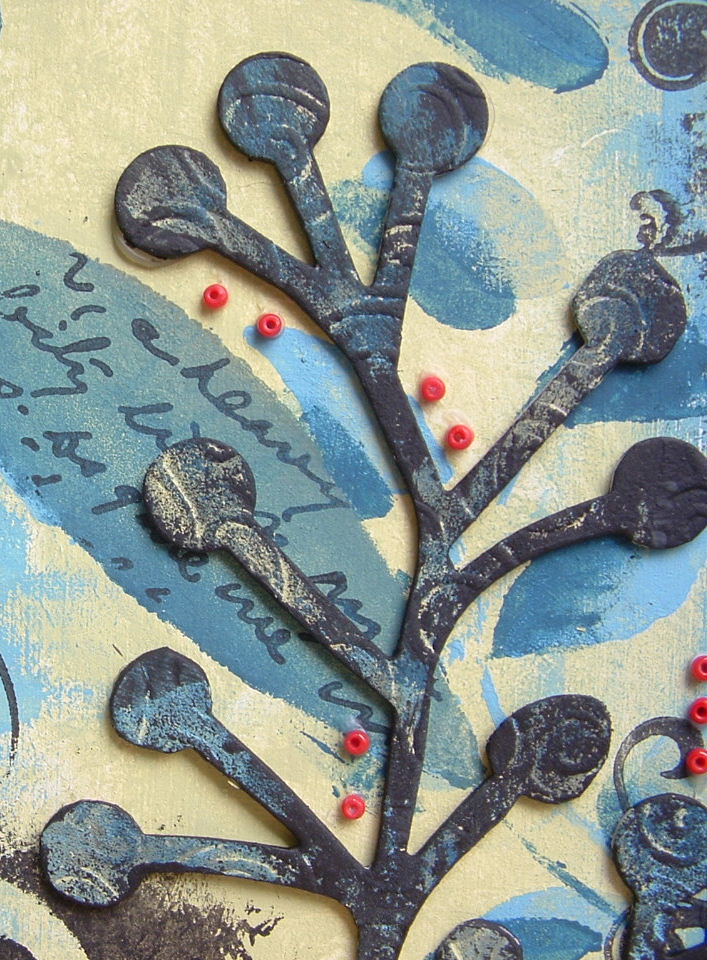
I painted up a die cut grunge paper bobbly thing (branch? tree?), and added more red accent beads.....

 More Grunge flourishes were added to 'Jims' head.......


 I may add a few more red paint accents here and there, haven't decided!


A fabulous class!
Trish xx

Monday 17 October 2011

Winging his way to Australia......

I'm a member of a swap group on Facebook run by the very talented Linda Baldock. The deadline for our second swap "The Animal In Me" has just past, so I thought I'd share my little bluebird friend who is on his way to his new owner in Aus!
 
He was made from felt, hand sewn together then with a multitude of beads added. I'm not a 'deep' person, so all of the representational stuff just passes me by......basically, I'm a bird with a load of beads, so that's what I made!
The first swap we did was an Art Doll. This is the doll I created......
Again, another creation now residing in Australia!!!
I can't wait to see what creation is going to arrive with me.... usually people post a few sneaky peeks before they send, but with this one I'm totally in the dark. We shall see!

Trish x


Thursday 13 October 2011

squeeeeeeeeeeeeeeeee!!


My bottle cap bracelet made the cover of the latest Beads and Beyond magazine!!!.
Here's a little peek of the cover...
is the magazine website for all the information!


Yay! Not had a cover for ages so very pleased!
Now need to calm down and get organised for the Lynne Perella class I'm taking tomorrow. Should be fun!

Trish x

Tuesday 11 October 2011

Workshop on the horizon....

So today I've been making clasps for the students to use.
This coming Sunday will be workshop two from the three repeat classes I'm teaching at Windmill Craft Centre. As its the second class, I can iron out any kinks in the teaching so these next two run very smoothly! Really, after nearly 10 years teaching these classes, you would think I could get it right first time, but no, something always crops up that you wish you could have done better. This time it was all about the timing. I knew I was being ambitious expecting my students to make two wire wrapped bracelets, but optimism won out! Not a plan. Half an hour over our allotted time frame we were still at it............. My solution is not to expect total novice wire workers to create two clasps themselves! I'm now going for one clasp predone by me, and then one which will be created under my supervision. Whether that gets us in on time remains to be seen!
Anyway, here's the clasp I've made for them all. Nice and chunky, from 1.25mm copper wire, hammered and then antiqued (which they couldn't do in class anyway, waaaaaaay to stinky!!) My thumb is in there for scale......


OK...off to sew more beads to a birds bottom.....really. Should be finished tomorrow so I'll reveal all then!

Saturday 8 October 2011

End of an Era?

This past week has been a sad one. I started an ATC swapping group back in 2005, and over the years we have created some frankly stupendous art and had great fun along the way. Made some fantastic friends and enjoyed wonderful company.
However, numbers have dwindled as life takes its twists and turns. People change direction in their creative lives and have moved away from ATCs. Others simply find circumstances have forced them away from time spent crafting. All totally understandable, that's life.
This past week we have started to talk of winding up the group at the end of the year. I think it needs to be done, however much I'll miss it!
So, thanks for all the fantabulous ATCs over the past 6 years ladies, I will miss seeing all your art!
I thought I'd post a pic of one of my favourite ATCs....This was from a 'Children' themed swap.
 

Time to start again....

Well.....its been flipping years since I started a blog. And did nothing with it.
My October resolution to myself, if there is such a thing, is to do another one.....So here goes nothing!