Friday 30 August 2013

Painty Asters- For Creative Expressions

Hello!
For my last DT piece for Creative Expressions, I decided to create a very 'Trish' piece, using lots of my favourite Creative Expressions products!
So.... a painty panel it is!
The background was created by smearing Waterfall, Lake and Lime Eco Green paint onto a white painted chipboard panel. I then brayered a little white paint over the top to soften the effect. Bottle top printing was next, using the same coloured paint as before. Onto the stamping!
As you can see, I used Sam Pooles background stamps for this, namely Bubble Wrap, Bubbles, Alphabet and Plaid. Once the ink was dry, I scraped some silver texture paste through some punchinella...
Whilst the silver added a bit of shine, I felt the whole thing needed a bit more colour, so I added in some red paint printing to give a little 'pop'.
The white stamped Asters were then added...
I coloured some acetate with red alcohol ink, then stamped a butterfly onto it. Cut out, then added to my aster!
A bit of twisted black wire to give the finishing touch as the feelers!
So, that's it!
I've loved being a part of the DT, and if you're quick, there is still time to apply to be part of the team for next year! All the details are here....
Thanks for having me, Creative Expressions!
Trish xx


Monday 26 August 2013

Weathered Wood style plaque

Hello!
I've gone all subtle and minimalistic.... not a bright colour in sight!
Here is a peek at my project on show over at Calico Crafts today...
I'd love it if you could pop on over to the blog here......... leave me a comment and let me know whether you think the 'less is more' approach to colour has worked!!
Trish xxxx

Sunday 25 August 2013

It's my job....

Hello!
My turn over at A Sprinkle Of Imagination today.... here's a little peek!
The blog post HERE has the whole thing!
Have a great day!
Trish xxx

Wednesday 21 August 2013

Live Everyday!

Hello!
School holidays mean not much time for blogging.... so its the bare minimum from me for a few weeks now unfortunately! Three weeks to go.......
My DT piece for Creative Expressions this week is a little circular plaque...
 (It looks wonky......tilt your head a little, it's just the photo! Everything is on straight, really!)
I cut a circle of card, and created a background using green acrylic drawing ink. I drew lines of varying thickness on the card, then went over them here and there for more depth of colour. I then splatted it with water, and dried it off....
I then stamped a flourish in white paint....this isn't showing up much in the pics, but its a nice 'ghost' image under the flower in real life!
The flower is the large Aster from this set.... on of my favourite flower stamps! To make the whole thing 'pop' I added tiny dots of red paint. A small thing, but it makes all the difference!
I dyed some ribbon with the drawing ink too, then tied it through an eyelet at the top of the circle...
A Rub On phrase to finish...
These drawing inks are really cool, the fine brush lets you add plenty of detail if you need to, but there is still the option of squishing drops right out of the vial should you need more ink to play with!
Trish xx


Saturday 17 August 2013

Texture Heart

Hello!
I have a textured painty heart to share over at A Sprinkle Of Imagination today! Here is a little peek...
HERE is a link to the blog so you can see the whole thing!
Have a nice weekend everyone!
Trish xxx

Thursday 15 August 2013

Vertical Heart Love

Hello!
This weeks DT piece for Creative Expressions is a painty panel.... with lots of grungy texture:
I started out with a cardboard rectangle, then peeled away the top layer in places to reveal the ridges beneath. I then stamped the Alphabet Background onto tissue, then used Glue N Seal to add it to the cardboard. Using this method means the stamped parts with mold themselves around the texture, in this case the ridges of the cardboard. Just about visible here:
Once the glue was dry, I smeared on some gesso, then a little turquoise paint. This was dried, then I applied some silver texture paste through some sequin waste. As you know, I love the bright shiny silver of this paste, but I wondered whether it could be toned down for that antiqued look.... Cue black paint and a baby wipe....
Yep, antiqued works too! I did the old 'smear on, wipe off' technique with the black paint on other areas of the panel too, just to blend it all together colourwise.
The hearts are from the Posy Floral stamp set, I've chopped up the 'flower' stem that has a heart for a flower head! Coloured them red, then added them to some twisted wire. A little Rub On word to finish....
I'm now almost at the end of my DT year with Creative Expressions, and the call has gone out for the new team for next year! Check out the link HERE, and why not enter?!
See you soon,
Trish xxx


Monday 12 August 2013

Spraying with paint....

Hello!
Nope, not gone out in the dead of night to do a little graffiti-ing, honest!
My project today for Calico Crafts is a wooden flower plaque...I've done lots of spraying and misting to get my colours..but I've used paint rather than ink sprays!
Here's a little peek....
Please pop on over to the Calico Crafts Blog to see the whole thing!
Trish xxx

Saturday 10 August 2013

Time After Time

Blimey...A Clean and Simple card??? I may need a lie down in a dark room!
Here is a little peek at todays DT post for A Sprinkle Of Imagination...
Please pop on over to the DT blog for a proper look here.....
Trish xxxxx

Friday 9 August 2013

imagine peace.... Craft Stamper Blog Challenge Four!

Hello!
It's that time again folks....a new challenge has just been unveiled over at the Craft Stamper Blog!
This time, the challenge is asking us to use acetate somewhere on our projects....and here is what I have created!
A triptych based on a field of poppies....
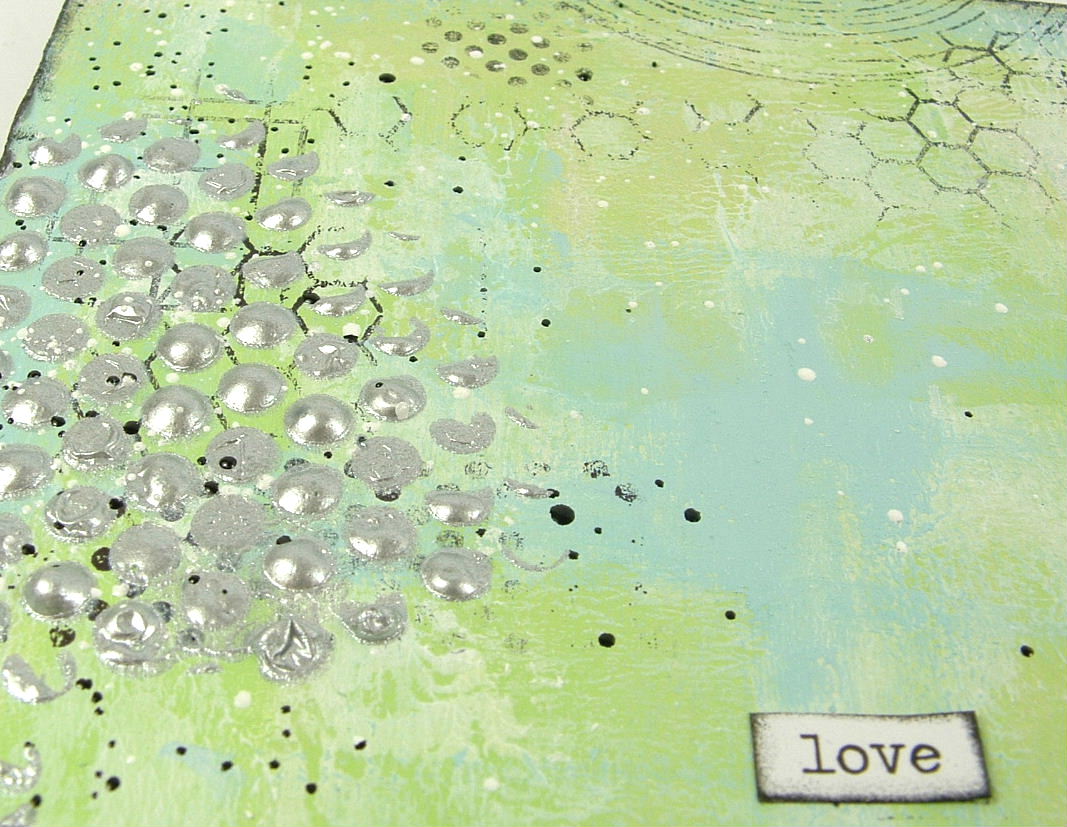
Loads of nice texture and shine on there, and its a really simple background for once!
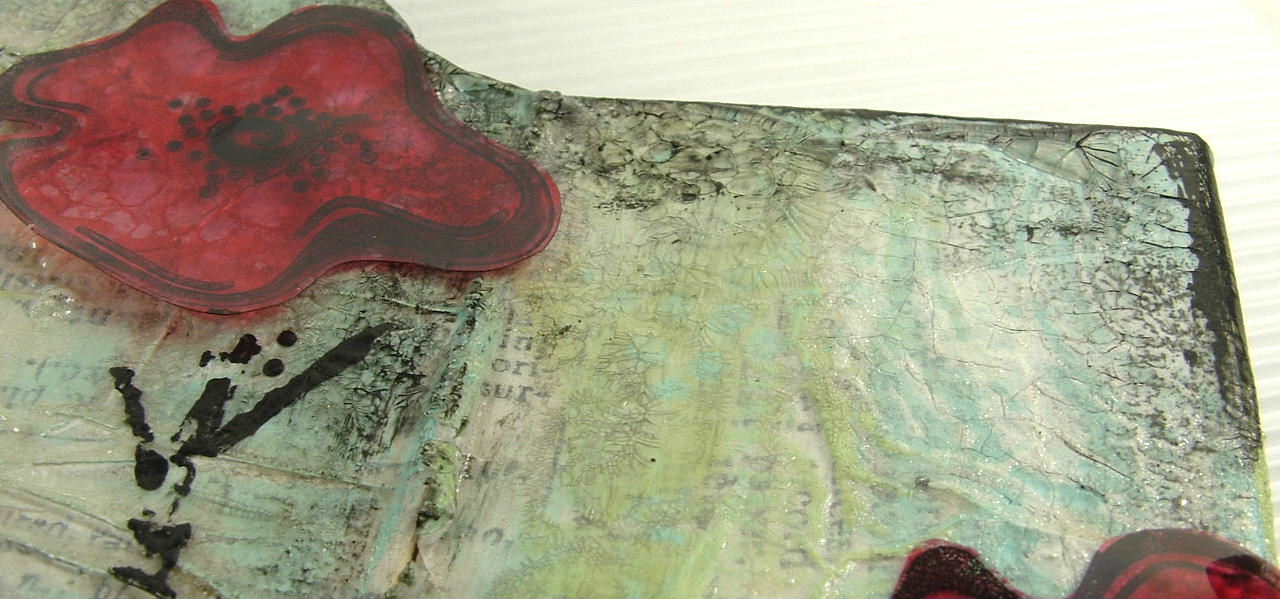
I crumpled up some text tissue paper, then glued it to my wooden triptych using a glue stick. I made sure to manipulate the paper to keep all the crumples! A quick wash with watered down gesso then gave it a toned down, shabby look. Smears of green and turquoise paint, then a little (and only a little!!) stamping...
Once the background was dry, I gave the whole thing a generous coat of One Step Crackle medium and left it.......
As well as the crackles, the medium gives a great gloss look to the piece too! The next step was to grunge the whole thing up. Black paint, used very sparingly, not only highlights the crackles....
It also highlights the crumples in the paper too....
I used my fingers to rub in tiny amounts of paint. If you think you've used too much, simply wipe it off with a baby wipe! Thats why I love acrylic paint....you can wipe mistakes away!
My poppies were stamped onto acetate and coloured with alcohol ink. I used heat resistant acetate, but even this can be curled slightly if you over heat it. I deliberately did this as I wanted a little movement in the petals....
Once they were glued on, I did a little printing with black paint to form the stems and foliage below, then added acetate grass! Very easy, just coloured with more alcohol ink and cut to shape!
As its acetate, it can be bent to give a more 3D effect...
Remnant Rub ons to add the wording...
I like the pop of bright red against the grunge!!!!
So.... now its over to you!
Acetate is in every crafters' stash somewhere isn't it? Why not dig it out, create something fabulous and enter the challenge!
Our sponsor this month is A Sprinkle Of Imagination....so not only could you end up being published, you could win a gift voucher too!
All the details can be found HERE...

Trish xxx


Thursday 8 August 2013

The sweetest thing....

Hello!
This weeks DT project for Creative Expressions is a very simple 10 cm square panel.....Kraft with a pop of colour!
The DT kit this month contained some gorgeous flower stamps ( Umount Floral Posy Floral 1 ) I stamped three of the single flower image, then cut out the flower head. I coloured the flowers with Cosmic Shimmer drawing inks. These three colours are in the Garden Twist set.
I covered the flowers with Clear Rock Candy crackle paint, then once dry rubbed a little brown Distress marker into the cracks to highlight....
The square Kraft base had a strip of book page glued onto it, then I sewed around the edge... I did a little gentle sponging with cream paint , and a touch of stamping to add a little detail. A Tim Holtz Rub On finished the look....
A simple little something to start off the month with this kit....I promise we'll get more complex as the month goes on!
Trish xx


Tuesday 6 August 2013

Love Me Do....

Hello!
Baked Bean tins......
yep, I've been (ha ha see what I did there?!) playing about with metal this week for my A Sprinkle Of Imagination DT project.
Little peek:
You'll need to hop on over HERE to get a proper look.....and I really hope you do!
Hope your day isn't as wet and windy as it is here...Summer has really vanished!
Trish xxx

Saturday 3 August 2013

Love Hearts

Hello!
My project this week for Creative Expressions is a painty panel, using the fabulous silver pearl (although I think it needs to be called SHINY, nothing pearly about it!) texture paste....
As well as the texture paste background, I've used embossing powder to add interest!
I started off by painting the chipboard white, then smeared with layers of green and blue paint. I stamped little details using black ink, using the plaid background and the chicken wire background stamps as well as a few dots and parts of a circle stamp...
I used white detail embossing powder to create dots too.... simply sponge embossing ink through a stencil, then sprinkle on the powder and melt....
I then scraped the texture paste through sequin waste of varying sizes, then heated that too, just to create the raised effect! Texture paste doesn't need to be heated, I just like the bubbled look!
I like to add splatters to my work, mostly using paint. For this piece, however, I used black and white embossing powder crystals to get the effect. Simply sprinkle a tiny amount of powder onto the background, then carefully heat (sometimes it works better to heat from behind the project, this way the granules don't get blown off!)
My focal images are hearts, simply punched out from stamped white card.....
I doodled the stems, then added the chit chat sticker word....
Have I mentioned how much I love this texture paste yet?!?!.....
Love Trish xxxx


Thursday 1 August 2013

Feelin' Hot Hot Hot....

Hello!
it's the first of the month, so that means it's time for a new challenge over at A Little Bit Crafty!
This months theme is Summer Sun....so I have made a painty panel (quelle suprise!) in lovely hot summery colours!
As ever, I gessoed the chipboard square first, then added the colours in layers on top. Lots of stencilling, stamping and printing....
I used light turquoise as my 'pop' colour, not much, just a few printed lines and dots!
I made sure to add a line where I knew I wanted my figure to go...always a must so the figure doesn't look like its floating in mid air!
My figure is a favourite Stampotique lady....
I've left her black and white to contrast with all the zingy colour on the background...just her heart was coloured with a little red paint. The words were typed on my vintage typewriter...one of my best Ebay buys ever!!
I hope you like it!
Remember, the ALBC challenges are not just for those who use digi images! Paula really wants people who craft in all sorts of ways to join in.....so if you have a spare minute, why not join in!
Trish xxxx