Wednesday 26 February 2014

Monochrome: For Stampotique

Hello!
Today is my last project as guest DT for Stampotique (sad face.....)
I've loved creating every project, and I have been absolutely thrilled that some of you have been inspired to create versions of your own! Gives me the warm fuzzies......!!
Anyway, on to todays project! The theme this week is Monochrome, something a bit tricky for a colour-aholic like me! I created this panel..

When you're working with such a restricted colour palette, you need to think towards texture for your interest, (as well as your images of course!) With this in mind, I tried to get as much on there as possible. Hopefully this will show up in the closeups, lets see!
I started off with some black cardstock, and roughly brayered over a layer of white paint...
As well as coverage, brayering roughly like this gives a rippled, almost stippled in places texture. I then went over it with a layer of black...
Layers, lots of lovely layers! Next, black and white text tissue...
More black brayering to help the tissue blend into the background...
I then stencilled with white paint...
Once this was dry, I put the stencil back in place and scraped rock candy crackle glaze through it. I love doing this, it gives such a cool look!
When dry, go over the crackles with a black Distress marker, rubbing the excess off with a dry cloth. The black will settle wonderfully into the cracks...
On the opposite side, I used black embossing paste through the same stencil....
I really like the spongy embossing paste look contrasting with the crackles!
I stitched the background onto some black card, and added a little more texture by way of white melted UTEE splatters, and some big white paint splats!
The stitching is a nice crisp contrast to the layers of paint..
My image was stamped simple in black, then added to a strip of dotty washi tape..
The final touch was the 'I thought of you' phrase, complemented by a punched out heart. I added some glossy accents to the heart, then heated it gently just to give a bubbly look to the glossy-ness!
I hope you like it!
I would just like to say a huge THANK YOU to the team over at Stampotique, I have really had a ball this month!

Stampotique stamps used:
Sheer
I thought of you today


Monday 24 February 2014

Filled Bottle Caps..

Hello!
I've been experimenting with Triple Thick Glaze (by Decoart) for my Calico Crafts DT piece this week. I wanted to see whether you could use the glaze to fill a bottle cap, and get that rock hard, crystal clear finish you achieve if you use resin!
I'll explain all, over at the Calico Crafts blog!
Trish xxx

Sunday 23 February 2014

You are so worth it!

Hello!
My DT piece for A Sprinkle Of Imagination this week is a colourful painty panal...complete with a stack of birds!
A little peek...
The whole thing is now live over on the ASOI creative team blog!
Have a great Sunday everyone,
Trish xxxx

Wednesday 19 February 2014

Acetate: For Stampotique!

Hello!
Week three of my Guest Designer month over at the Stampotique Designer Challenge Blog ! Thank you all once again for the lovely comments made on my 'pairs' piece last week!
This time, the challenge is all about acetate. I love using acetate in all kinds of ways, and for this challenge I decided to use it to help me create some depth to my piece. Which is this....
I made a shrine type assemblage, lots of layers and a cool red and blue colour scheme! You really need to see this sideways on to see how my elements are layered to give the depth...
To build up these layers, you need to have a base you can build up in layers too. That way you can add elements as you go along. There are chipboard designs out there that you can layer up wonderfully, but I decided to make my own. That way, I have total control over the size and shape. This is a little fiddly, but I'm going to take you through it, step by step!
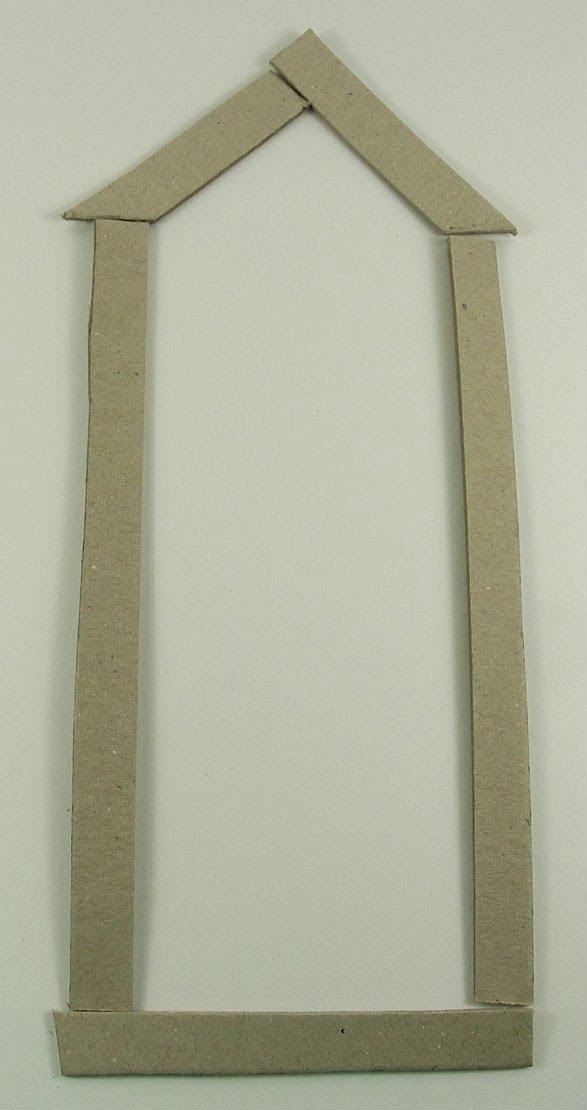
First, I decided on the shape and size of my shrine. I then cut strips of greyboard to create the frame.

Don't worry about exact measurements, the finished frame will be covered in layers of paper and paint anyway! I stuck the first frame layer together with masking tape...
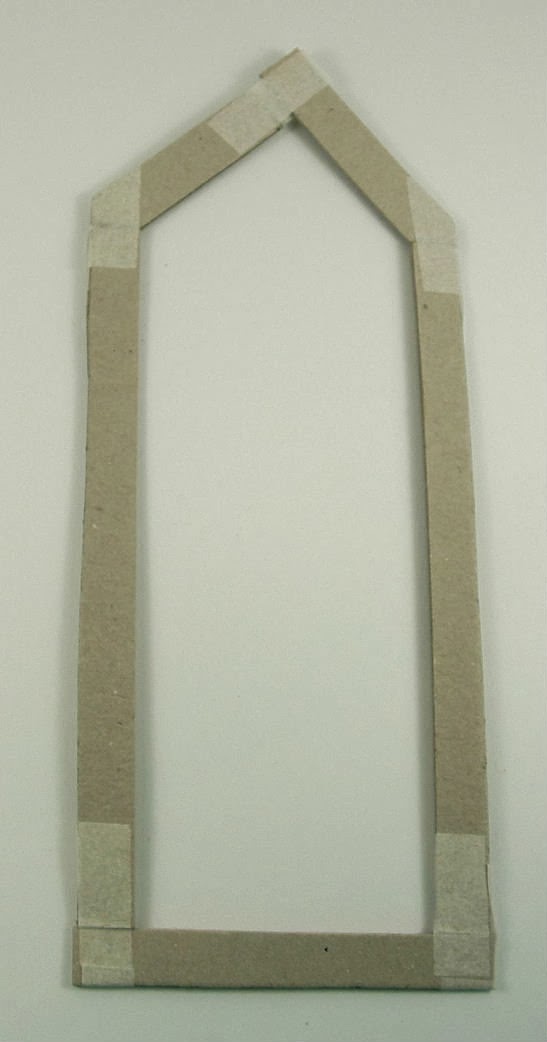
I then glued more strips over the first lot, giving me a frame two layers deep.
Next, acetate time! Stamp the seaweed design onto acetate, then colour the blobs! I love to colour acetate by painting the design on the stamped side, then flipping the acetate over so you have a smooth shiny finish!
I cut the acetate out, then stuck it to the bottom of the frame. I'd decided not to use all the height of this first image, so the end hangs off the frame at this point!
A third and fourth layer of greyboard frame was then added on top. Bulldog clips will keep everything together whilst the glue dries!
(As you can see, I chopped the excess image off!!)
The main figure image is the next layer, so I stamped and coloured her, before adding wings made with more acetate! The wings are coloured with paint too. I cut her out, leaving an extra bit of card under her foot. This was then glued to the top of the fourth layer of greyboard...

The fifth and final greyboard layer was then glued on top....
If you have an image that exceeds the limits of your frame, make sure you don't accidentally glue the wrong bits down! I had to keep a careful eye on the right hand wing!!
Once the frame is dry, its ready to be covered with old book pages. The most fiddly part of the frame to get access to is the inside, so we need to deal with this first, before we put the back on!
Tear tiny bits of paper to cover the parts where your acetate and card elements go into the frame. Once dry, it can be painted...
I wanted another red dotty seaweed element in my shrine, so created another using acetate in the same way as before. This time, I needed it to be slightly larger, so carried through the 'stems' by drawing lines with a permanent pen...
This time, I stuck it to the very back of the frame, slightly behind the figure....
Next, the back. Draw around your shrine (or whatever your shape is!), onto cardstock, then create a messy painty background!
I've added in some printing, then melted sprinkles of white UTEE to give both a gentle splatter effect and a little texture. The back can now be glued to the frame....
More old book pages are now glued on, to cover all the frame that is still visible!
Once the glue is dry, the top and edges can be painted to match the back...
I added tiny red dots as well, just to tie in my colour scheme!
The final touch is the star on the apex of my shrine...
Acetate again! Topped off with a word sticker.....
So, all finished! Mary is looking very folorn, despite her shiny wings...
Let's hope she can wish upon that star and cheer up a bit!!!!
Hope you like my project this week...
Stampotique stamps used:
Mary
Seaweed
Big Bee
Jo's Star

See you next week for my final GDT project!
Trish xxxxx


Friday 14 February 2014

Craft Stamper Blog Challenge!

Hello!
The new Craft Stamper Blog challenge starts today...and it's a short one because we have..
 EXCITING NEWS!!!!
From March, the CS blog challenge is going MONTHLY!
Yep, a new challenge every month, still with fabulous prizes and the opportunity to get published in the UKs number one stamping magazine for the winner!
The current challenge is all about repeat stamping using a small stamp, and the DT have created some stunning projects for you to look at...why not go and take a peek? (and join in, of course!!)
http://craftstamper.blogspot.co.uk/2014/02/take-it-make-it-challenge-7.html

Wednesday 12 February 2014

Stampotique Part Two!

Hello!
I can't believe it has been a week since my first Guest Designer spot for Stampotique!
THANK YOU to all those who left such nice words about my first piece, I was very touched!
The second challenge this month over on the Stampotique Designers Blog is 'Perfect Pairs', so I've created this painty panel...
Lots of 'pairs' going on here!
I'll take you through the 'how to'.....
I used a Tando chipboard panel as my base, and painted it white first to get rid of the grey chipboard colour. Then, the first of my pairs...(or my 'twos' !) I've used two colours of paint, blue and pink, smeared onto the base...
Next, I stencilled a few circles. In pairs, of course!
You can cover parts of your stencil with masking tape, that way the paint will only go through certain parts. I left two circles free of tape in my sequin waste. I did the same thing with smaller sequin waste, then added dots...
So, lots of pairs of circles! I then added pairs of lines and dots in the base colours of blue and pink..
A little stamping....the number '2' of course!
(edged in black, and with a few black ink splats to tie the black stamping into the background)
I cut two stripey stalks from card (just like we created legs for the art doll last week), and then added two stamped stars...
I added a hanger by means of eyelets (two!), and threading with two strands of cord...
So...lots of pairs going on!
Stampotique Stamps used:
Jos Star
Number Cubes

See you next week with more step by steps for another Stampotique project!
Trish xxx


Sunday 9 February 2014

Tone on tone paint effects!

Hello!
Sometimes, life just goes bonkers and you end up forgetting everything......well, I should have posted this HOURS ago...... big oops!
My DT post today for A Sprinkle Of Imagination is all about using waste, painty scrap paper as your main focal image.... here is a little peek...
I would love it if you went over to the ASOI blog and had a look at the whole thing!
See you tomorrow!
Trish xx


Wednesday 5 February 2014

Stampotique News!

Hello!
I'm very pleased to be able to share something today...I'm a guest designer over at Stampotique Designer Challenge for the month of February!
I'll be sharing a project each week, and I'll have all the step by step pics to show you how I created them all!
My first project has gone live today....and here she is!
A quirky art doll..... couldn't resist! The theme this week is all about hearts, so I included a couple of heart wings as well as the main, shiny red heart Miss Snottie is holding!
So, how did she come into being? Grab a cuppa, this could take a while!.....
First, we need a base for her body. I made a cone...
Easy peasy, draw around a plate, cut a slit up to the centre point, then wrap around itself until you have the cone shape you want. Glue and a bulldog clip  to fasten it together. I then painted it blue, just in case there were any gaps in her 'dress'. Didn't want the white showing through...
Next, paint up some scrap card in different shades of green and blue, then stamp the banner onto them...
Cut out each triangle flag....
Of course it depends on the size of the cone, but I reckon I needed nearly 200 of these triangle flags to cover mine....yep, each one glued on individually....
(You won't see the very point of the cone, so no need to go all the way up to the top)
I made her stand next....
I make these a lot, and they are dead easy to do. I shared a little tutorial before Christmas HERE on how to make them!
Next up, the wings. Paint more card, then stamp a background stamp repeatedly on it. The large heart was then stamped twice over the top....
Once cut out, these are ready to be assembled. The small heart was also stamped onto painted card. I gave it a coat of Glossy Accents for a nice shiny effect.
Now, legs. I love stripey legs, and the easiest way to do them is to draw stripes onto scrap card....
Then cut out into a leg shape! I've added fine lines, and some red glitter shoes....
I used wire to make arms for my art doll. This is easy once you get a feel for bending and twisting wire into the shapes you want, so have a play with some scrap wire first if you're not sure!
The last piece to be made was Miss Snottie herself! Stamped and coloured with a combination of paint and Promarkers...
Cut her out, then we can begin to assemble!
I stamped a phrase onto copy paper (not card! Copy paper is much more flexible when you want to stick it on a curved surface!), then added it to the base...
The legs were then glued to the vertical wire, and the cone placed over the whole thing. The wire arms were glued on the back, and shaped to look like they are holding the heart...
They aren't actually holding it, the heart is glued to the dress! The wings went on over the arms...
And last, but certainly not least, Miss Snottie was glued in position!
All done!
I really hope you like her, I had a ball making her!
Stampotique stamps used:
Banner
My Heart
My Heart Small
Seaweed
Miss Snottie
Love and be loved