Monday 29 October 2012

Queen For A day...A Canvas Tutorial!

Morning!
I have a tutorial to share with you all today...a little step by step on how to create this....
A mixed media canvas assemblage....cor doesn't that sound a bit posh!!!! Basically, getting messy with paint and glue!!
Firstly.... start with a nice chunky canvas, and give it a base of lime paint. Smear with your fingers, nothing too technical..
Remember, the key to this is getting each layer totally dry before adding the next! Whenever you finish a layer, dry it off before continuing....Gently brayer a layer of gesso over the canvas. Don't go bonkers and cover it...the idea is for a bit of texture not a total whiteout!..
Smear on some turquoise paint..
More brayering...
You'll notice that drying off the gesso and paint with a heat gun gives some fabulous texture as the paint/gesso expands! Next, take stencils (I've used sequin waste in two sizes) and sponge through to give some detail. Use very little paint on the sponge!
Don't forget the edges....and add in a little stamping with paint as well!
Stamp some more on the front...
Use the three colours (lime, turquoise,white) that you've used on the background to give a cohesive look to this part...
(Hope you're remembering to dry off each layer!) Now, we can go in with our accent colour..the shade that gives a bit of 'pop' to the piece. I've used fucshia..
I've used bottletops to print with as well as the stamping! I edge my piece with this colour too. Next, stamp a flourish onto tissue paper and dry thoroughly...
It would be impossible to get this level of detail if we tried to stamp directly onto the surface of the canvas. Too much texture, not enough stability of the surface etc etc.... and... we want the image to go round corners!!! Use a layer of Mod Podge both underneath and on top of the image to adhere it to the canvas..
Told you it was messy!!! This needs to dry for about 12 -ish hours, so leave it and come back later!....
OK, once the glue is dry, we can move on. The glue will have dried clear, and the tissue paper looks invisible! result!
The only downside to using tissue like this is that the surface of the canvas is now smooth.... The texture has disappeared under a layer of glue. The LOOK is still there, though, just not a 'touchy feely' type of texture. However, we can add more on top if we're careful. Careful is the word, though, too much heat on top of the glued tissue will make it lift from the surface. Not a plan. Heat gently, don't go mad at this point!
(Apologies for the blurry pic)..print on the canvas using painty pencil dots and the sides of old store cards..
Stamp a little girl onto cardstock  and cut her out...
Add her to the canvas..
The canvas had feet and a little crown if you recall, so now is the time to decorate those too...
Add the wooden bead feet to the bottom...
and the crown to the top..
Now, all you need is the words and you're done....
Phew!!!
Have a go, its so much fun getting messy!!!
Love Trish xxxxxx


Thursday 25 October 2012

Pink Rudolph -For Creative Expressions

Morning all!
Today I'm sharing my latest project for Creative Expressions ..... a quirky, painty Christmas hanging!
Something a little different, not your usual Christmas colours or sentiment!
I started off by creating a painty background on a piece of cardstock, using Waterfall , Grape and Raspberry Eco Green paint. Bit of White in there too! I stamped the snowflake and the holly from the featured stamp plate ( Tim Holtz Christmas Time ) onto the background...
and I also used the Chicken Wire Stamp by Sam Poole to create a little more texture..

As well as the main background, I also created a painty rectangle the same way. I stamped the 'Merry Christmas' sentiment from the featured stamp set onto white card, cut it out then adhered it to this rectangle. This becomes the hanging part of the piece...
Rudolph himself was also stamped and cut out, then I added a little Pink Stickles to his nose!
The words were computer generated by me, then cut out and added to the background......
To join the main piece to the sentiment panel, I punched holes in the cardstock. I threaded wire through the holes, then twisted it around itself to secure...
To create the hanger at the top, a longer piece of wire was threaded through punched holes. I twisted the ends of the wire around a pencil to create a coil. This not only looks good, but stops the wire from going back through the holes and coming undone.
So there you have it..... Bit of a fun project for me to finish on with this stamp set!
 Be sure to check back next Thursday for another creation using a whole new set of fab stamps!!
Love Trish xxx


Monday 22 October 2012

Sneaky Peek for Calico Crafts

Yep, another Monday, another start to the week!
I have my last Halloween themed project for Calico Crafts on the BLOG today...
A little teaser...
Why not pop on over and take a look at the whole thing! I would love for you to leave me a little comment over there too.....that way the boss can see I'm doing my job!!!! :)
Love Trish xxxx

Sunday 21 October 2012

Painty backgrounds- the simple way!

Hello!
Lots of people have said to me that they would like to have a go at painty backgrounds for a change from all the ink, but they don't know where to start! (It's at this point that I direct them in the direction of my DVD, obviously!!! he he he...) no seriously, the best way to start is with something that takes seconds but is still very effective. Once you've 'dipped your toe into the water' as it were, you can begin to make things as complicated as you wish!
I thought I'd show you a simple paint background to show you what I mean...
This took minutes, the most time was used in drying between layers! Palest colour first, in this case cream. I simply put a blob on a palette knife and scraped it across the cardstock. Plastic palette knives are about £2 for 5, so a really cheap tool to get hold of! Dry it off with a heat gun, as wet paint on top of wet paint isn't a plan. We're going for layers, not a colour mixing exercise! Tan paint was then scraped across in the same manner, and dried. The pink was applied a bit more sparingly. I used a bamboo skewer to print lines across the other two colours.
And that was it! Of course you could go to town at this point, stamping,printing, stencilling, texture paste-ing etc etc. Simple can be good though sometimes!
I sewed around the distressed edges of the cardstock
Smudged just a bit of paint both on the edges and the stitching, just to take off that stark black effect.
The image is a very old Peddlers Pack stamp, stamped onto French text and cut out. I've adhered it with my hot glue gun, as it gives that little bit of a 3D look, but without having to wait ages for silicone glue to dry...
A chit chat sticker word, and its done. See, told you it wouldn't take ages!!!
I'm joining in with my favourite colour challenge with this piece... why not go check out what everyone else has been up to over at CR84FN , loads of fab projects using the colours of light pink, cream and tan!
Have fun!
Love Trish xx


Saturday 20 October 2012

Spooky!

Morning!
I did a bit of a 'mop up' of paint from my project last Monday... I use a bit of acetate as a palette, and if I have loads of paint left over then I'll either scrape it onto some card, or do what I did with this, just squish the whole piece of cardstock on top of the painty palette! Gives a great starting point for another bit of art....
I've added in some extra stamping and splatting..
and some texture by way of coloured puff paint through a stencil....
The word is made from painted up Alphaparts..
And I've chosen a suitably spooky image...
Now, it might seem a little strange that a dedicated rubber stamper and messy art creator like me uses digital stamps, but I do! This wonderful image is by Dilly Beans and I love it! The best thing is the fact you can resize the images to whatever fits your project, not to mention the fact that they are waaaaaay cheaper than buying actual stamps. Great for images like Halloween type ones that you may not use lots and lots during the rest of the year. So, don't just automatically associate digi stamps with Copic or Promarker users, have a look and see what's out there!!!
Have a fab weekend!
Love Trish xxxx


Thursday 18 October 2012

Santa Bauble- For Creative Expressions

Morning!
I have a little (er..not so little..grab a cuppa and pull up a chair!) tutorial for you today, a step by step showing you how I created my latest piece for Creative Expressions! I made a Santa Bauble card, using the fabulous Tim Holtz Christmas Time stamp set....
Lots of subtle sparkle....
so its nice and Christmassy.... and lots of splats...
so its also very 'me' !!!!!
Right, here goes with the instructions!
Firstly, take a piece of white card, and stamp the snowflakes randomly using Snow Cap paint. Tricky to see in the pic, but its there!
Dry the paint snowflakes thoroughly, then blend Broken China Distress Ink onto the card. The paint will resist the ink, so the snowflakes will show through.
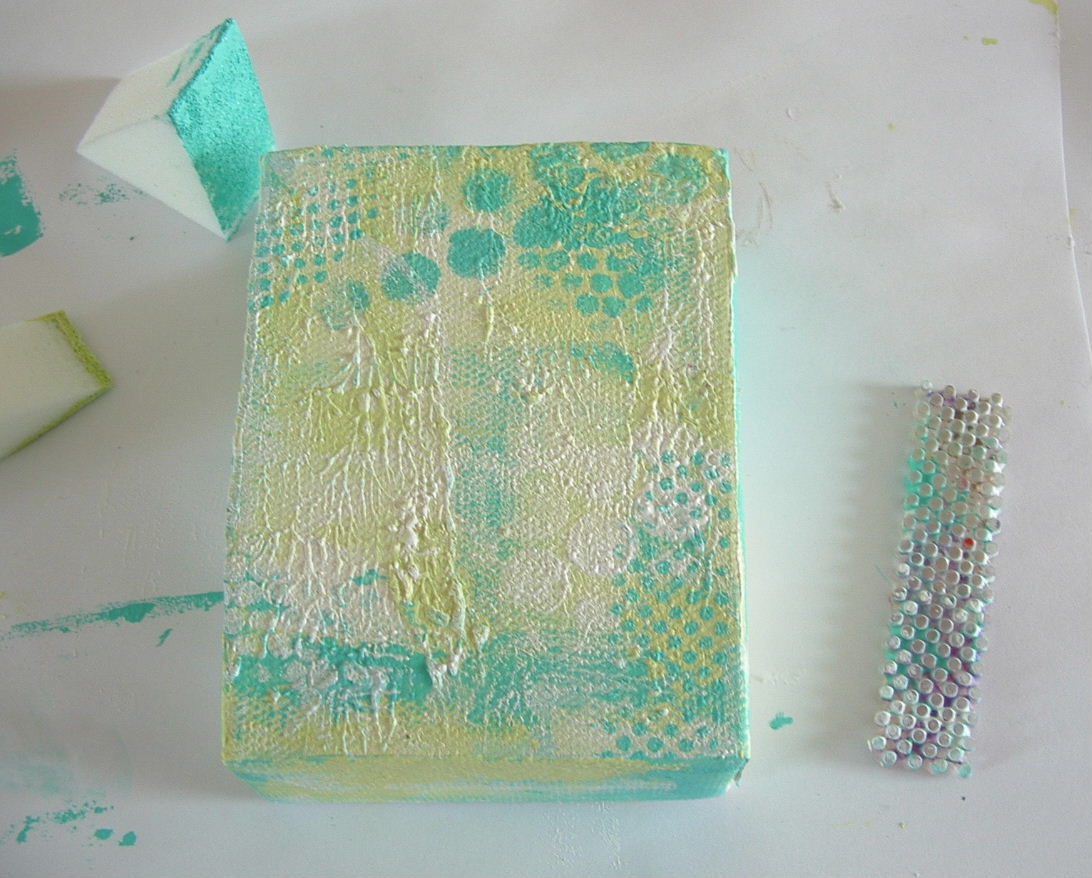
Cover the whole card with ink in this manner. Next, rub the ink pad onto a craft sheet. Add a few drops of Broken China Reinker , and spritz with water....
'Smoosh' your snowflake stamped card through this inky mess. Dry off and repeat until you have a background you like. Whilst you're at it, do the same to a bit of scrap card, we'll need this later.
Make sure the snowflake card is totally dry, then stamp more snowflakes, this time using Embossing Ink . Sprinkle Ranger Sticky Embossing powder over the images....
Heat the powder. As soon as it melts it becomes sticky, so immediately pour Rock Candy dry glitter over the sticky areas.
Top tip: Let the images go COMPLETELY cold before brushing off any excess glitter. If the sticky embossing powder is still a little warm and you try to brush the glitter off, you will get rid of it all, image as well!
Now my favourite bit....getting messy! Put a dab of white paint, reinker and Perfect Pearls onto your craft mat, add add a little water to each. Using a paintbrush, flick a little of each onto the background to create splats.......
That's the background all done. Next, the bauble. Remember the extra bit of card you coloured? Stamp Santa onto the card. Don't worry about inking the whole image as we don't need it all for this bit..
Cut a circle from acetate, and use it as a template to draw around the Santa. Cut him out too.....
Using Glossy Accents , glue the acetate to the top of the stamped image. Add a little around the edges too, and dip them in the Dry Stickles glitter.
Set this aside to dry. To create the top of the bauble, cut a small square from card, and wrap it in Foil Tape
Use an embossing tool or the end of a used up biro to impress lines into the foil covered square..
Squeeze a little Silver Paint onto a craft sheet, then use the edge of an old store card to create a silver line on your background. This will be the 'hanging attachment' for the bauble.
Once this is dry, glue the bauble into place. Mat onto blue card, then a white card blank, and you're all finished!
Hopefully you're all still awake!! The glitter snowflakes are very subtle in the picture, but in real life they add a fab sheen to the piece!
Tune in again next Thursday for another (and this one's very quirky!) take on creating with this great stamp set!
love Trish xx