Morning!
I have a tutorial to share with you all today...a little step by step on how to create this....
A mixed media canvas assemblage....cor doesn't that sound a bit posh!!!! Basically, getting messy with paint and glue!!
Firstly.... start with a nice chunky canvas, and give it a base of lime paint. Smear with your fingers, nothing too technical..
Remember, the key to this is getting each layer totally dry before adding the next! Whenever you finish a layer, dry it off before continuing....Gently brayer a layer of gesso over the canvas. Don't go bonkers and cover it...the idea is for a bit of texture not a total whiteout!..
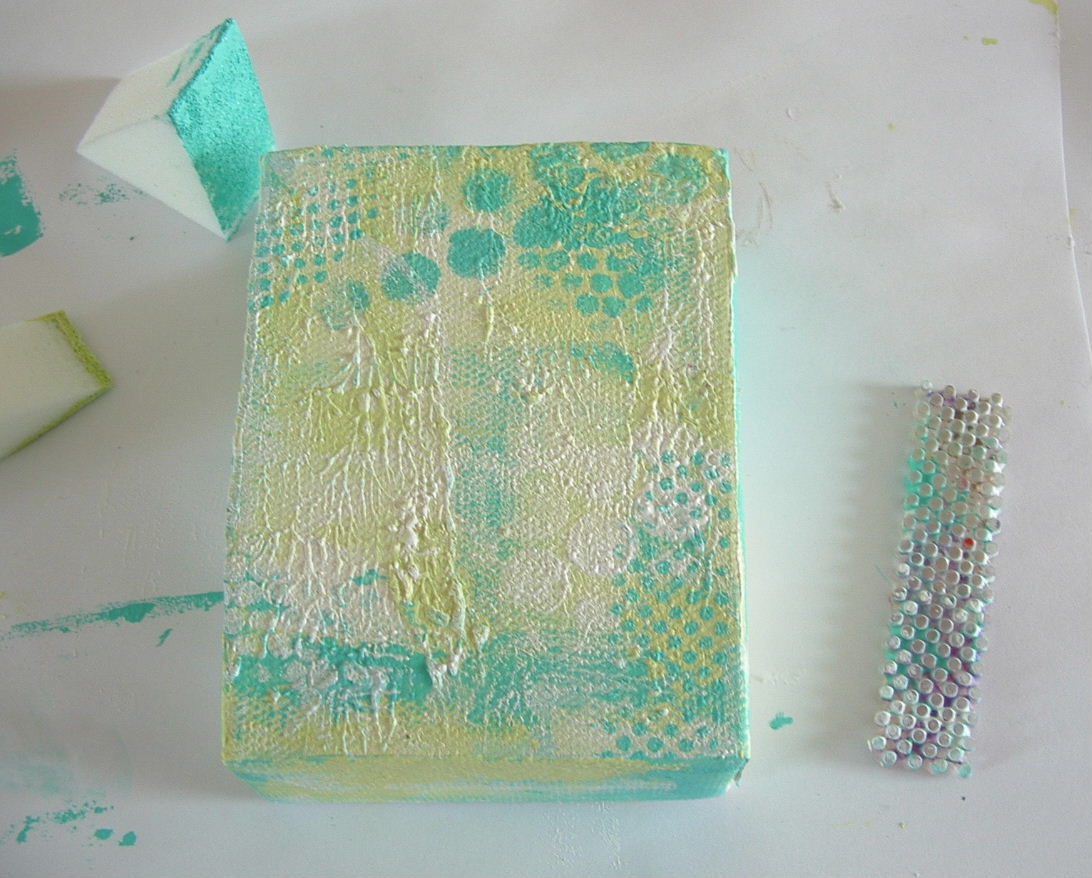
Smear on some turquoise paint..
More brayering...
You'll notice that drying off the gesso and paint with a heat gun gives some fabulous texture as the paint/gesso expands! Next, take stencils (I've used sequin waste in two sizes) and sponge through to give some detail. Use very little paint on the sponge!
Don't forget the edges....and add in a little stamping with paint as well!
Stamp some more on the front...
Use the three colours (lime, turquoise,white) that you've used on the background to give a cohesive look to this part...
(Hope you're remembering to dry off each layer!) Now, we can go in with our accent colour..the shade that gives a bit of 'pop' to the piece. I've used fucshia..
I've used bottletops to print with as well as the stamping! I edge my piece with this colour too. Next, stamp a flourish onto tissue paper and dry thoroughly...
It would be impossible to get this level of detail if we tried to stamp directly onto the surface of the canvas. Too much texture, not enough stability of the surface etc etc.... and... we want the image to go round corners!!! Use a layer of Mod Podge both underneath and on top of the image to adhere it to the canvas..
Told you it was messy!!! This needs to dry for about 12 -ish hours, so leave it and come back later!....
OK, once the glue is dry, we can move on. The glue will have dried clear, and the tissue paper looks invisible! result!
The only downside to using tissue like this is that the surface of the canvas is now smooth.... The texture has disappeared under a layer of glue. The LOOK is still there, though, just not a 'touchy feely' type of texture. However, we can add more on top if we're careful. Careful is the word, though, too much heat on top of the glued tissue will make it lift from the surface. Not a plan. Heat gently, don't go mad at this point!
(Apologies for the blurry pic)..print on the canvas using painty pencil dots and the sides of old store cards..
Stamp a little girl onto cardstock and cut her out...
Add her to the canvas..
The canvas had feet and a little crown if you recall, so now is the time to decorate those too...
Add the wooden bead feet to the bottom...
and the crown to the top..
Now, all you need is the words and you're done....
Phew!!!
Have a go, its so much fun getting messy!!!
Love Trish xxxxxx


Thank you sooooo much for sharing this Trish. Lovely clear instructions and I must try it as I confess to being a little scared of paint as it dries so quickly.
ReplyDeleteFinger painting appeals too - must be my inner child lol
Stunning canvas!
Fliss xx
Fabulous Trish, I always love inky backgrounds and this is wonderful. I always love your use of colour too. Wonderful creation. Tracy x x
ReplyDeleteAmazing as ever Trish. Love that fushia pop and the beautiful tissue swirl. It all combines so well. Hugs, Buttons x
ReplyDeleteit´s great ... thank you for this great Tut Trish!
ReplyDeleteWonderful Trish, I really love this colour combo - as soon as I can use my right hand again, I am going to have a go xx
ReplyDeleteGorgeous canvas and a really fantastic tutorial - so clear. I love the tissue paper image against all that texture! Thank you for all the inspiration you provide...
ReplyDeleteAlison x
Fabulous canvas! Thank you so much for the amazing tutorial. You are so talented! xx
ReplyDeleteI thoroughly enjoyed this blog, thanks for sharing.
ReplyDelete