Friday, 12 April 2013

"big hair" -for the Craft Stamper Make It, Take It Challenge!

Hello!
Hooray! Another Challenge has been revealed this morning over at the Craft Stamper Blog!
I really really hope you all play along with this one, its so easy and so fun!
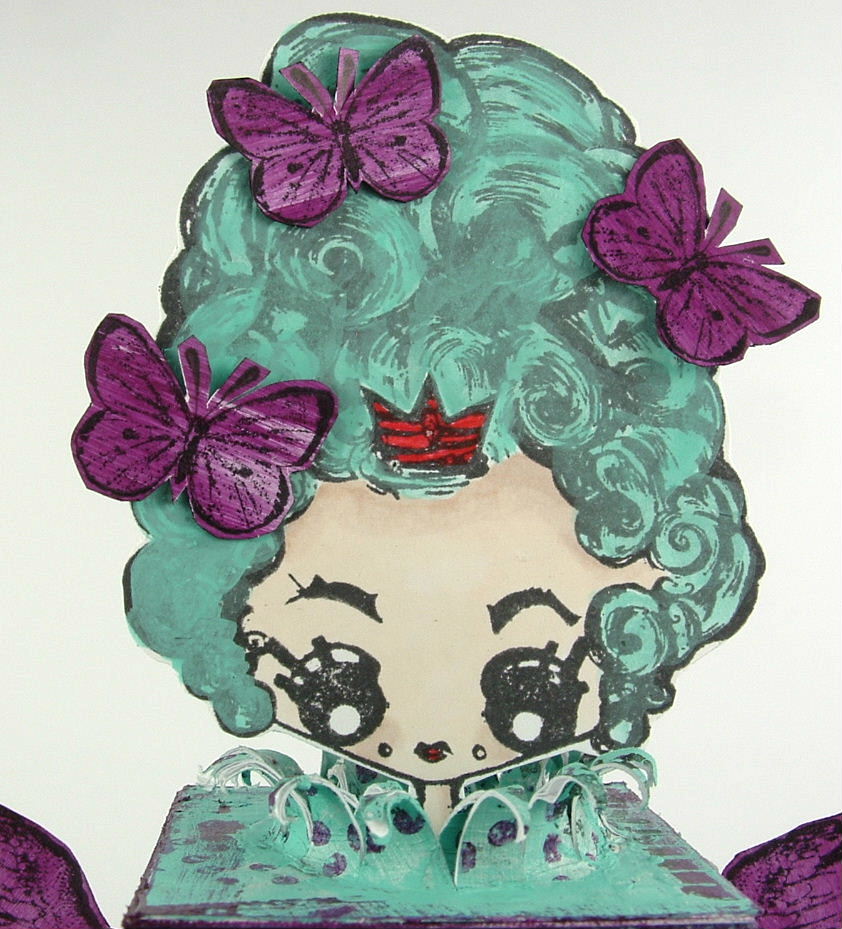
The Craft Stamper challenges always focus on a technique shown the current issue of the magazine, the idea is that you take the technique and make it your own...hence the name, Take It, Make It challenge! This time the technique is a fabulous ripping and tearing technique, showcased wonderfully by Helen Chilton on pages 78-81 of the May 2013 issue. The DT have shared their takes on the technique on the main Blog post HERE.... My contribution is 'big hair'.....
Yes, OK, I admit it... this looks NOTHING like the other DT makes does it?!! I really wanted to show everyone that you can think totally out of the box with this technique. The ripping and tearing technique IS there.....
See?! That pic is a closeup of the top of my block, before I added her head!!
I decided to create a person because when I looked at the ripped and torn frame from the side it reminded me of a ruff, a kind of Victorian collar type thing. The whole body/wings/spool end project evolved from there!
I started by painting a wooden block and spool. White as a base, then turquoise and a grape colour smeared over the top. I stamped using paint and black ink, and added in a few bits of book pages here and there..
The heart on the front is metal, painted red then given a coat of crackle glaze. I typed the words then stuck them on..
My lady is Marie Antoinette by The Octopode Factory....Isn't that hair huge?! Not surprised there are butterflies nesting in it...

I glued the head onto the top of the block in the middle of my ripped and torn frame...
A pair of purple stamped wings later and it was done...
Something a little quirky and different!
Hopefully you'll be inspired to play along with the challenge, the winner gets published in the magazine, and there is a fab stamp from Indigo Blu up for grabs as well!
All the details can be found on the Challenge post HERE!
Good Luck!
Trish xxxxxxx


Thursday, 11 April 2013

Monochrome 'love'

Hello!
This weeks DT piece for Creative Expressions has a distinct monochrome look, Kraft and white!
I've made a romantic hanging, very muted and with loads of subtle sparkly flowers!
My base is a square of chipboard with hessian glued to it. This gives fab texture and interest, and helps the 'natural' look! I stamped the large swirl from the Funky Flowers plate onto acetate using paint, then attached it to the hessian (which I had given a little coat of white paint!)
Stamping onto acetate is a good way of getting crisp detail over a surface such as the hessian. Glued using hot glue in one corner, this 'mess' can be covered easily with embellishments, in this case three tiny rolled roses!
My main image is the fabulous Steampunk Dressform by Sam Poole. As I've done before, I've 'unsteampunked' it by chopping off the cogs! I white embossed it onto Kraft card, cut it out then added a second set of wings....
These were also white embossed, but on acetate not card! I attached the hanger ( a bit of white painted driftwood) to the panel using wire threaded through some holes....
The word 'love' comes from the gorgeous Art Houses plate that the DT showcased last month...

The final touches were the hanging roses....
I thought I would give you a little 'how to'.... the roses are super simple to make, and its just as easy to turn them into dangly embellishments!
Start off by cutting a square of card. The bigger the card, the bigger the roses! If you want to create lots of similar sized roses, make sure you start with the same size of card!
Draw a spiral on the card. Don't worry about being precise, and experiment with both wide and thin spirals to see the different effects you get!
Cut out the spiral, and rub out your pencil lines!
I like to bend and roll the edges of the spiral as I find it gives a more relaxed, less rigid look. It's up to you!
Start to roll up the spiral. I like to start off the roll with my pokey tool to get a neat roll in the centre.
Keep rolling...I hold the rose in between my thumb and forefinger and wind the spiral around...
Once you've rolled all the cardstock, bend over the last bit to give a 'base', something for the rose to sit on..
Carefully turn the rose over, and place on your palm to relax slightly...
Once it has opened to give the look you want, flip back over and secure the rose by using glue. I use hot glue, and squish the rose tightly until the glue has set....
Now you are ready to decorate! I've sponged on a little white paint....
Then added Clear Rock Candy Stickles with some glue n seal.....
Now to create the hanger.... twist some wire into a loop shape, then glue to a circle of matching cardstock...
Glue this to the underside of the rose....
Looks a bit messy, but we won't be looking at the back! From the front it looks fine.....
See?! Now you can add your sparkly rose dangle to your project!

Phew...congrats if you're still here!!!!
One last pic of the whole thing...
See you soon!
Trish xxxxxx


Monday, 8 April 2013

Love Shack

Hello!
Today I'm sharing a little fairy house over at Calico Crafts....
Loads more photos, and a 'how to' over on the blog now...why not pop on over and let me know what you think!
Love Trish xxxxx

Sunday, 7 April 2013

I brought you flowers....

Hello!
I want to share a tag today....got the paints out and had a messy playtime!
I've used PaperArtsy Fresco paints for this, namely Bora Bora, Limelight, Claret and South Pacific. I scraped Bora Bora (the paler blue) and Limelight (pale yellow/green) onto the tag using a palette knife, then added a little Claret (red) here and there. I then overstamped with black ink, as well as printing with South Pacific (dark turquoise) and Claret....
I coloured my Stampotique figure (Pigtails) with the paints too, using a waterbrush.
(The skin was done with Promarkers!)
I punched out a flower from the base of the tag.....
I backed the cut out hole with black card...and then used the punched out flower as an embellishment. I added some coiled wire to the flower, then attached it to my figure....
I typed the phrase, then added it to finish!
I would like to enter this tag into the Stampotique Designers Challenge 94- flowers
Have a great week everyone!
love Trish xx


Saturday, 6 April 2013

(A Sprinkle Of) Imagination!

Hello!
A bit of a change for me today, I've been making jewellery! Not that making jewellery is a change really, I make rather a lot of it.... just don't blog it! Should really blog it more often I suppose....
Anyway, today over at A Sprinkle Of Imagination sees the start of my month long 'jewellery -fest'!!!
Here is the bangle I made....
If you pop on over to the ASOI blog , there is a step by step in picture form of how I made it....annnnnnd......if you leave me a comment over there, you could win the bracelet itself!
Have a lovely weekend,
Trish xxxxxx

Friday, 5 April 2013

Creative Expressions blog hop- part two!

Wow! Thank you for all your comments on my blog hop post!
There is still time to leave me a little message, and you'll be put into the draw for £15 worth of crafty goodies (Cosmic Shimmer products, That Special Touch masks and ,of course,ribbon!!) The draw is open until we announce the winners on Monday 8th April...
The main reason for this little extra post is to let you know that the supremely talented Kim Dellow has added a post to the hop today...with extra prizes to be won!
You NEED to check it out...its stunning!!!
Here is the link you need : Kims fabulous blog hop creation!
Love Trish xxxx

Wednesday, 3 April 2013

Creative Expressions Sheer Inspiration Blog Hop!

Hello!
Yay, a blog hop! I do like a good blog hop to play along with, don't you?!
So..... Welcome to the Sheer Inspiration blog hop, brought to you by the lovely folks over at Creative Expressions! If you have arrived here from Tracys blog, then you're in the right place...if not, no matter! The full list of all taking part is here:
Trish Latimer (me!!)

Don't forget to check out our fellow DT member Kim Dellow's blog on Friday April 5th for a special surprise!
Now...what did I make? This....

The focus of the blog hop is to showcase some of the gorgeous ribbon Creative Expressions has. I have chosen the fabulous stripey Grosgrain ribbon, in the black/ivory colourway. As you can see, it didn't stay ivory for long!
I created flowers from my ribbon, here is how.....
First, cut the ribbon into strips...
Then sew the ends together to turn them into cylinders....
Next, sew along the one edge of the cylinder, using a running stitch...
Pull the thread tight, and oversew a few times to secure....
Now, you could use the flower just like this, but I like to get messy! To dye the ribbon, simple cover with Distress Stains and then dry...
When you dye any kind of fabric like this, the resulting colour will depend on what that fabric is made from. Pure cotton will give a far darker colour than a fabric with lots of manmade fibres in it. This is just a case of trying out your fabric (or ribbon of course!) and looking to see what shade is created!
I punched a circle of card to act as my flower centre. I coloured the card with the exact colour (Seedless Preserves) of Distress Stain that I used for the ribbon.....
You can see how the manmade fibres in the ribbon tone down the purple, compared to the colour on the cardstock. I love the tone on tone look, personally!
The flower is now all ready to be added to your project!
I started with an 8 x 8 piece of cardstock, and added background colour using Distress Stains in Peacock Feathers, Shabby Shutters and Seedless Preserves. Simply apply stain to your craft sheet, spray with water then dip and swish the card through the mess! I wanted white spaces, to did this a little more sparingly than usual!
The background was then stamped using the same Distress colours, just in ink pad form! I used Bubble wrap background, Chicken wire, Alphabet and a Grid from the Urban Beats plate....
I used coils of wire for my flower stems...
My turquoise flower was created in the same was as the other two, I just cut the ribbon into strips before I pulled the running stitch tight. Be careful not to snip too far if you try this, or you'll chop up the whole thing by mistake!
The leaves are actually petals from Sam Pooles fab Zentangle Flower stamp......
I added a few stripey touches to echo the stripey-ness (is that a word?!) of the ribbon.... a strip down one side..
And some 'grass' along the bottom (mainly to hide the glue where I attached the wire coils, but don't tell anyone!)
I had initially created smaller 'grassy' pieces to add at the bottom, but went with a longer strip in the end. I still used the 'rejects' along the edges though, I quite like them!
The simple words were typed and then glued on...
Phew....and here it is again so you don't have to scroll back up!
I hope you like my ribbon creation!
The marvellous people at Creative Expressions are offering a prize of £15 on each blog on the hop! To enter the giveaways simply leave a comment on each of the 8 DT blogs (listed above). The hop will close and prize winners will be announced on Monday 8th April on the Creative Expressions News blog. One winner will be chosen by Random Number Generator from the comments of EACH of the 8 blog hop posts!

 The next blog to hop to is Jean Gursoy
Enjoy!

love Trish xxxxxxx