Hello!
I've been making jewellery with WOW embossing powder and some of their fabulous moulds.....and I didn't want to waste the 'experiment' that I created first! I've turned it into a little home decor piece.....
The blue glittery rose is made from WOW Melt It powder and blue glitter embossing powder. Really easy, just melt the powders and pour into the mould! I discovered the trick to getting a glittery finish like this....
on the surface of the rose is to add a little glitter EP to the mould before adding the rest of the molten powder. The heat from the molten powder melts the glitter EP just enough to make it stick, but not so much that it is incorporated into the whole mixture. It won't rub off the rose!
I glued the rose to some strands of wire, then pushed the wire into a hole I had drilled in a driftwood disc....
The disc was painted white, and I added some cut up letters to form the word first!
The leaves are made by my much used technique of bending wire into shape, then adding Glossy Accents into the shape created by the wire...
As you can see, I added a little text stamped paper behind the leaf shape, and I also added a teeny bit of alcohol ink to colour the Glossy Accents blue!
It's very handy that this week 'Blue' is the theme over at the Simon Says Stamp Monday Challenge, so I'm linking up my blue flower creation!
Have a great day!
Trish xxxx
Friday, 10 January 2014
Tuesday, 7 January 2014
Resolutions?!
Hello!
My only New Years resolution this year is to start being more adventurous in the art department! Use techniques and products I haven't used for ages, rather than just 'comfort crafting'!
So, today starts that resolution, with a little collage going on!
My DT piece for A Sprinkle Of Imagination this week has a collaged art doll as part of it....
Collage...something I should do more of! Great fun, and the results are weird and quirky, just the thing I always aim for!
The whole thing is over on the creative team blog HERE!
Have fun,
Trish xxxxx
My only New Years resolution this year is to start being more adventurous in the art department! Use techniques and products I haven't used for ages, rather than just 'comfort crafting'!
So, today starts that resolution, with a little collage going on!
My DT piece for A Sprinkle Of Imagination this week has a collaged art doll as part of it....
Collage...something I should do more of! Great fun, and the results are weird and quirky, just the thing I always aim for!
The whole thing is over on the creative team blog HERE!
Have fun,
Trish xxxxx
Saturday, 21 December 2013
Merry Christmas Everybody!
My last post for 2013, time to take a couple of weeks off and enjoy the festive season!
I'll leave you with my last 2013 DT post for Calico Crafts...
Have a fabulous Christmas, and I'll see you all in 2014!
Lots of love, Trish xxxx
Friday, 20 December 2013
Bright Bright Greetings!
Hello!
I have totally gone against any kind of typical seasonal colour scheme for my A Sprinkle Of Imagination DT creation today! Painty though, of course!
A little peek...
Just a tiny bit of the edge of some Christmas trees there.... so it is a timely make after all!
please pop on over to the blog HERE and see the whole thing!
love Trish xxx
I have totally gone against any kind of typical seasonal colour scheme for my A Sprinkle Of Imagination DT creation today! Painty though, of course!
A little peek...
Just a tiny bit of the edge of some Christmas trees there.... so it is a timely make after all!
please pop on over to the blog HERE and see the whole thing!
love Trish xxx
Tuesday, 17 December 2013
New Colour Challenge...
Over at A Sprinkle Of Imagination!
It's a great palette this time....nothing too wintery or Christmassy for those of us with seasonal overload!
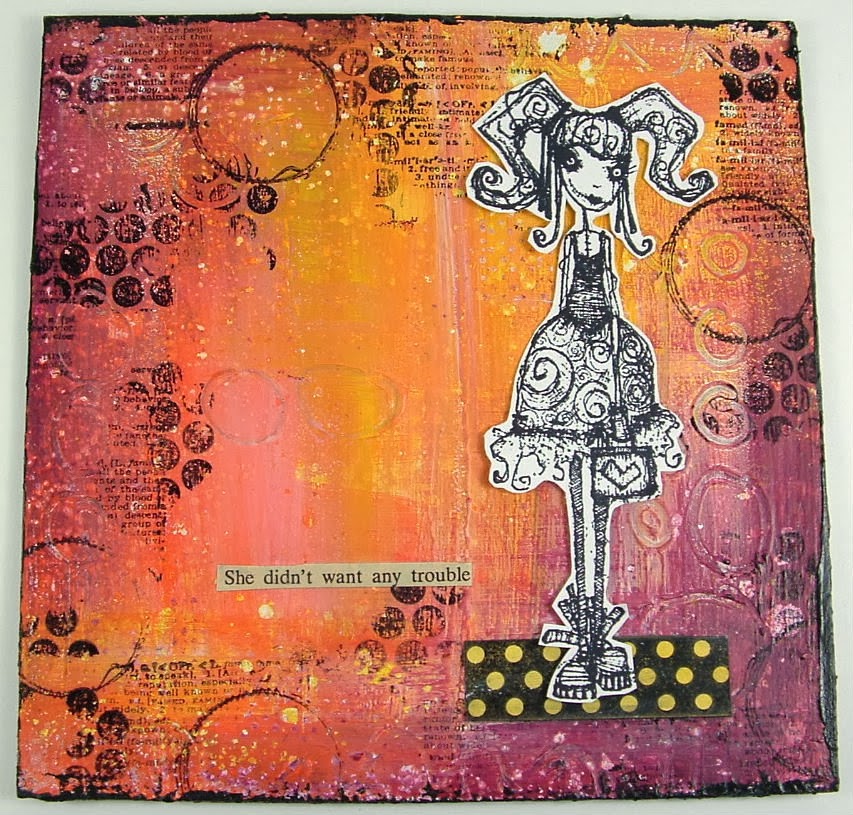
I made this....
I covered my chipboard sheet with a thick layer of gesso, then doodled in the wet gesso with the end of a paintbrush. Once its dry, and you add colour over the top, you can see the designs you made underneath. Great texture! You can see the circles here....
The colours were painted on with a brush for once (I've discovered cheap blusher brushes from the pound shop are FABULOUS as paint brushes! Nice and fat!) As I painted them all on one after the other, a little blending occurred here and there....
Before drying off the paint, I spritzed it with water, then blotted with paper towel. That dotty effect? Thats the water droplets removing a little paint!
As you can see, I stamped using black Archival ink...
Prima Dots, Jennie Bowlin Text and a Prima Stitched circle.
A black and white Stampotique figure to offset all the colour...
She is standing on a bit of faux washi tape.... It's actually a washi tape stamp from Prima, stamped onto yellow painted card! I chopped the ends of to square it up slightly...
I hope you have a play with these colours, they are a really good combo to work with! All the details of how to enter the challenge can be found on the ASOI blog HERE...
Have a great week!
Trish xxxxx
It's a great palette this time....nothing too wintery or Christmassy for those of us with seasonal overload!
I made this....
I covered my chipboard sheet with a thick layer of gesso, then doodled in the wet gesso with the end of a paintbrush. Once its dry, and you add colour over the top, you can see the designs you made underneath. Great texture! You can see the circles here....
The colours were painted on with a brush for once (I've discovered cheap blusher brushes from the pound shop are FABULOUS as paint brushes! Nice and fat!) As I painted them all on one after the other, a little blending occurred here and there....
Before drying off the paint, I spritzed it with water, then blotted with paper towel. That dotty effect? Thats the water droplets removing a little paint!
As you can see, I stamped using black Archival ink...
Prima Dots, Jennie Bowlin Text and a Prima Stitched circle.
A black and white Stampotique figure to offset all the colour...
She is standing on a bit of faux washi tape.... It's actually a washi tape stamp from Prima, stamped onto yellow painted card! I chopped the ends of to square it up slightly...
I hope you have a play with these colours, they are a really good combo to work with! All the details of how to enter the challenge can be found on the ASOI blog HERE...
Have a great week!
Trish xxxxx
Friday, 13 December 2013
Ombré!!!
Hello!
Today marks the start of another Craft Stamper Blog Challenge!
And what is the challenge this time? Ombré.....
What? well yes, that's what I thought as well, but actually it's a term for something we've all been doing for ages!
Simply, creating colour gradients, going from light to dark (or the other way around!) So, you start at the top of the paper with a dark colour, and gradually lighten it as you go towards the bottom. See? Easy peasy....
I made this...
As you can see, I used the ombré effect as my background green colour. It starts dark at the top, and fades to a paler shade at the bottom!
I added areas of interest with stamping and printing...
And also added some washi tape and a phrase from an old book..
My image is an Octopode Factory lady, coloured using paints (with a waterbrush) and some Promarkers for the skin colour....
There were a fabulous number of entries for the challenge last time, and with such a great prize on offer, why not have a go? All the details are HERE...
Love Trish xx
Today marks the start of another Craft Stamper Blog Challenge!
And what is the challenge this time? Ombré.....
What? well yes, that's what I thought as well, but actually it's a term for something we've all been doing for ages!
Simply, creating colour gradients, going from light to dark (or the other way around!) So, you start at the top of the paper with a dark colour, and gradually lighten it as you go towards the bottom. See? Easy peasy....
I made this...
As you can see, I used the ombré effect as my background green colour. It starts dark at the top, and fades to a paler shade at the bottom!
I added areas of interest with stamping and printing...
And also added some washi tape and a phrase from an old book..
My image is an Octopode Factory lady, coloured using paints (with a waterbrush) and some Promarkers for the skin colour....
There were a fabulous number of entries for the challenge last time, and with such a great prize on offer, why not have a go? All the details are HERE...
Love Trish xx
Monday, 9 December 2013
Festive Merriment!
Hello!
Painty, messy, Christmassy.... with a text tree and some doodling thrown in too!
That just about sums up my project for A Sprinkle Of Imagination today!
Here is a little look....
The whole thing is now live over on the Creative Team blog HERE.....
Have a great week weveryone!
Trish xx
Painty, messy, Christmassy.... with a text tree and some doodling thrown in too!
That just about sums up my project for A Sprinkle Of Imagination today!
Here is a little look....
The whole thing is now live over on the Creative Team blog HERE.....
Have a great week weveryone!
Trish xx
Tuesday, 3 December 2013
Follow The Star..
Hello!
I've made an Art Doll Christmas Fairy as my project today over at A Sprinkle Of Imagination....
For this project, I've gone over how she was created in a long series of step by step pictures....it's not as difficult as it may appear!
I would love it if you would take a peek and let me know what you think! The ASOI creative team blog is HERE....
Have a great week..
Trish xxxxx
I've made an Art Doll Christmas Fairy as my project today over at A Sprinkle Of Imagination....
For this project, I've gone over how she was created in a long series of step by step pictures....it's not as difficult as it may appear!
I would love it if you would take a peek and let me know what you think! The ASOI creative team blog is HERE....
Have a great week..
Trish xxxxx
Monday, 2 December 2013
Christmas Wreath
Hello!
I'm still making decorations........today I want to share a wreath I've created using rolled roses!
All the details, and a step by step picture guide to making the roses themselves are now live over at the Calico Crafts creative team blog! Here is a little taster...
You can find the complete project HERE...
See you tomorrow!
Love Trish xx
I'm still making decorations........today I want to share a wreath I've created using rolled roses!
All the details, and a step by step picture guide to making the roses themselves are now live over at the Calico Crafts creative team blog! Here is a little taster...
You can find the complete project HERE...
See you tomorrow!
Love Trish xx
Sunday, 1 December 2013
A Little Bit Christmas!
Hello!
It's the first of the month, so that means a new challenge over at A Little Bit Crafty!
As you might imagine, the theme this month is Christmas related : "Christmas Cheer"
As Paula is always very keen to see all kinds of crafts in the challenge, I decided to go a little '3D assemblage' for this one! I made a tree......
I love the whole 'kraft/text/white' kind of colour scheme for Christmas, as well as my more usual bright and vibrant colours!
This is an easy make, the trickiest thing to create is the stand. Having said that, these kinds of stands are very useful for other kinds of assemblage, so it's a useful technique to have. Here's how....
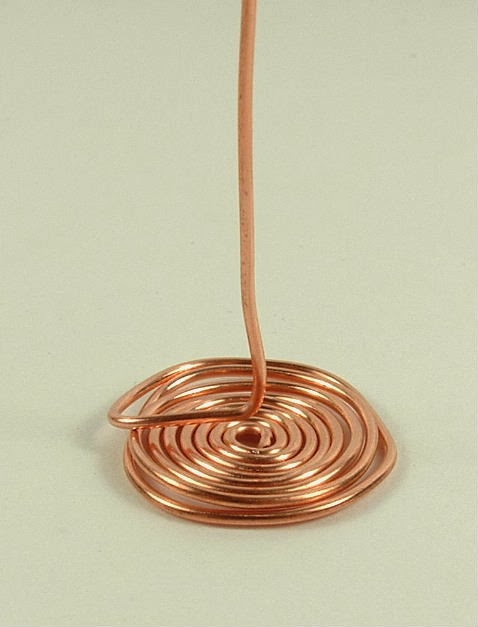
Cut two circles from thick card. I've used greyboard, chipboard would be good too! Take a long length of wire and create a spiral in one end. Make sure the spiral is a little smaller than the circles....
Bend the wire so it lies flat across the very centre of the spiral...
Bend the wire again so it is at right angles to the centre of the spiral, standing straight up...
Glue one circle to the spiral...
Poke a hole in the centre of the other circle, then slide over the wire. Glue in place...
The structure is there now, but it looks a bit messy! I have covered the greyboard with text paper...
Now can get on with creating the rest of the tree. Cut circles of varying sizes from Glassine paper (other types of paper/card will work too!)
I cut lots, but only ended up using three of each size! Place them neatly in a pile, then piece a hole through them all with a needle tool!
(I added in some tiny circles I had punched out, so there are five sizes in total)
Take each circle, and stamp using white paint. I used a text stamp..
Crumple up the circles, then smooth out until almost flat. Gently swipe white paint over the creases, and edge the circles with the paint as well...
Now we can start to add the circles to the wire. Start with he largest circles...
and work through all the sizes, ending with the smallest...
You can fiddle about to your hearts content, positioning the circles into place!
To create the star, simple cut two text covered shapes from card. At this point, you can now trim the wire at the top of the tree to size, based upon how big your stars are!...
Simply glue the two stars back to back, sandwiching the wire in between the two....
All done! I have placed my tree on a white glitter snow fall...
Nice and simple, but very rustic and tactile too!
Hope you like it...and don't forget to join in with the ALBC challenge! It would be great to see some altered artists join in too!
Trish xxxx
It's the first of the month, so that means a new challenge over at A Little Bit Crafty!
As you might imagine, the theme this month is Christmas related : "Christmas Cheer"
As Paula is always very keen to see all kinds of crafts in the challenge, I decided to go a little '3D assemblage' for this one! I made a tree......
I love the whole 'kraft/text/white' kind of colour scheme for Christmas, as well as my more usual bright and vibrant colours!
This is an easy make, the trickiest thing to create is the stand. Having said that, these kinds of stands are very useful for other kinds of assemblage, so it's a useful technique to have. Here's how....
Cut two circles from thick card. I've used greyboard, chipboard would be good too! Take a long length of wire and create a spiral in one end. Make sure the spiral is a little smaller than the circles....
Bend the wire so it lies flat across the very centre of the spiral...
Bend the wire again so it is at right angles to the centre of the spiral, standing straight up...
Glue one circle to the spiral...
Poke a hole in the centre of the other circle, then slide over the wire. Glue in place...
The structure is there now, but it looks a bit messy! I have covered the greyboard with text paper...
Now can get on with creating the rest of the tree. Cut circles of varying sizes from Glassine paper (other types of paper/card will work too!)
I cut lots, but only ended up using three of each size! Place them neatly in a pile, then piece a hole through them all with a needle tool!
(I added in some tiny circles I had punched out, so there are five sizes in total)
Take each circle, and stamp using white paint. I used a text stamp..
Crumple up the circles, then smooth out until almost flat. Gently swipe white paint over the creases, and edge the circles with the paint as well...
Now we can start to add the circles to the wire. Start with he largest circles...
and work through all the sizes, ending with the smallest...
You can fiddle about to your hearts content, positioning the circles into place!
To create the star, simple cut two text covered shapes from card. At this point, you can now trim the wire at the top of the tree to size, based upon how big your stars are!...
Simply glue the two stars back to back, sandwiching the wire in between the two....
All done! I have placed my tree on a white glitter snow fall...
Nice and simple, but very rustic and tactile too!
Hope you like it...and don't forget to join in with the ALBC challenge! It would be great to see some altered artists join in too!
Trish xxxx
Subscribe to:
Posts (Atom)